
Old Back Bath Vanity | 
New Vanity |
|
Old Back Bath Vanity |
New Vanity |
| Back Bath ReDo | Toilet Paper Holder | Vanity Diagram & Cut List | Frame |
| Under Mount Sink | Formica | Drawers | Drawer Fronts |
| Slider | Drawer Pulls |
The old vanity in our back bath had several features I didn't like, such as an ugly dark green tiled top, a drop in sink (took up lots of counter space), and the toilet paper holder had bolts that stuck almost 4" into the inside obstructing access to the storage under the sink. The tiny vanity was about 4" narrower than any standard vanity I have found, so I decided I needed to build a new one.
I wanted a large storage area, with a sliding shelf, and drawers on one side.
Once upon a time I had surfaced a work bench with formica so I thought this would be a good top surface for the vanity and back splashes.
The back splashes will be 1/2" thick instead of 3/4".
I found an undermount Krohler vanity sink at Lowes which looks great.
The top of the old vanity is exactly flush with the sides of the vanity, no overhanding lip, I really wanted a rounded front corner but I don't see that as possible with the space limitations.
I am also intending to build a frameless vanity, like the wall cabinets.
I always thought that 3/4" thick back spalshes were exorbitantly thick, so I'm going to make mine 1/2" thick, to improve counter top space.
The vanity top will be 1/2" wider and deeper than the cabinet with a slightly rounded front corner.
I had always felt the space on either side and in front of the vanity sink was wasted so I at least can put the new toilet paper holder there.
The flush drawers will have pine frames with seperately constructed, mitered, flat panels, like the linen closet sliders. The front frame will be 1x2 with a 5mm thick plywood flat panel. The front frame will be painted natural and the inset flat panels will be painted white like the vanity frame. A wooden drawer pull or handle will be in each front.
The slider will be more like a drawer (5-1/2" high sides) with a tall front panel. The back wall will have notches or slots for the plumbing to clear. I thinking about backfitting some of our other sliders like this.

|
| Click for larger Pic |

| 1/2" AC plywood being cut out for vanity sides, floor, internal bulkhead, and front pieces. |

| Pieces cut for vanity sides, floor, etc. leaning against the lathe bench. The white (melamine covered) parts behind the new vanity parts are from the large, above the toilet, cabinet, those should be handy for jigs. |

| Vanity side panels with floor support bars being glued on. |

| You can see the miter on the left side panel for the lower front panel under the toe space. |

| New vanity being glued, sides, floor, lower front panel. |

| Top front panel being glued. |

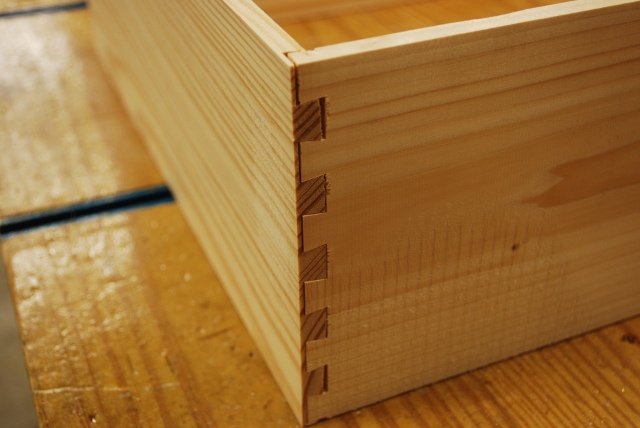
| Close up of one of the 1/2" plywood miter joints from the edge. For more info and pics of how I do this please take a look at our Range Box Page. Next glue blocks glued into the inside corners for added strength. |

| Center baffle being glued in new vanity. Notice the ClampIts keeping everything square. |

| Right side (against the wall) of new vanity. |

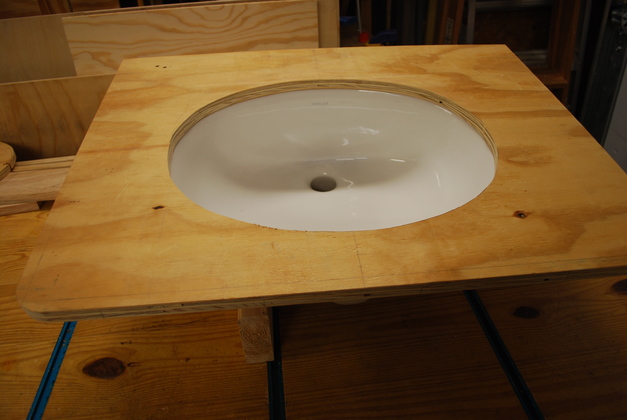
| Top cut out, test fit. You'll note the slight rounded front corner. |

| A little better look at the slightly rounded corner. 1/2" projection front and side, and closer on the corner. Also note the mitered cabinet corner! You don't have to show plywood edge, or use cap strip to use it in furniture! |

| Sink hole sawed and sanded but top not attached. You can see the notch sawed in the center baffle to clear the sink. |

| Back being glued. |

| I used the top's biscuits to hold the sides in place while I glued the back. |

| Left rear quarter of vanity with back. |

| Painting bottom of new vanity. |

| Sealer coat on entire vanity. |

| Now a hi gloss layer. |

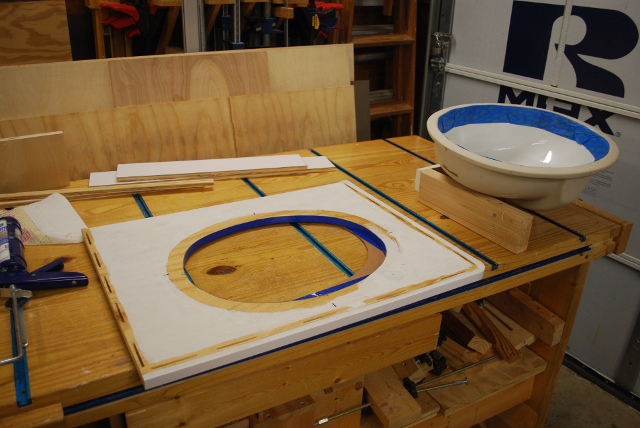
| The undermount sink and the template I made from it's box. Note the piece I cut out, on the left, had a hole in the center. I laid the bowl, face down and centered, on the cardboard, then reached inside, through the hole, and drew a line with a short pencil on the cardboard around the inside of the bowl. I removed the bowl and cut out the line. I reinforced the edges of the template with blue painters tape. |

| Under mount sink sitting on test frame. |
| Test fit for vanity top and undermount sink. I saved the oblong I cut out for the sink, I'm going to use it later as a clamp block. |
| Under side of vanity top, painted and taped, ready to apply silicone sealer and attach sink. The Formica edge banding is already in place around the inside of the sink cutout. |

| 4x8 sheet of Formica on the shop floor, ready to cut. You'll note my shop is small, makes it hard to maneuver a 4x8 sheet of anything. |

| Top and formica behind it. |

| Back splashes and extension with formica all cut to fit and ready for contact cement. |

| Edge banding stips cut. |

| Top with Formica test fit. Note that at the back corner I clamped a ClampIt to the bench to help align the Formica to the top after I apply the contact cement. |

| I had to re-activate the glue on the end of the backsplash edge. |

| Gluing the edging for the undermount sink. I used the oblong piece cut out of the hole, as a clamp block, to put pressure on the inside of the edge, note the wedges. You can also see the binscuit slots around the edge to attach to the cabinet frame. |

| The corner (1-1/2" radius). I had to gently sand some of the backing off the edging, then heat with a heat gun as I bent it around this sharp corner. |

| Back and side backsplashes, the side backspalsh edging (foreground) still needs trimming. |

| Vanity top test fit, you can also see the new toiletpaper holder (needs paint). |

| Front quarter view. The toilet paper holder is test fit and not painted yet. |

| After trimming with a straight laminate trimmer bit, I beveled the outside edges with this bevel laminate bit. I took off just enough to make the edge not feel quite so sharp. |

| Close look at test piece beveled trimmed edge (red circle). You can see the test bevel to the left of center. We used this to determine how deep to bevel. Please excuse the little bit of contact cement on the edge banding, I haven't cleaned up this test piece yet. |

| Painted and faucet mounted. |
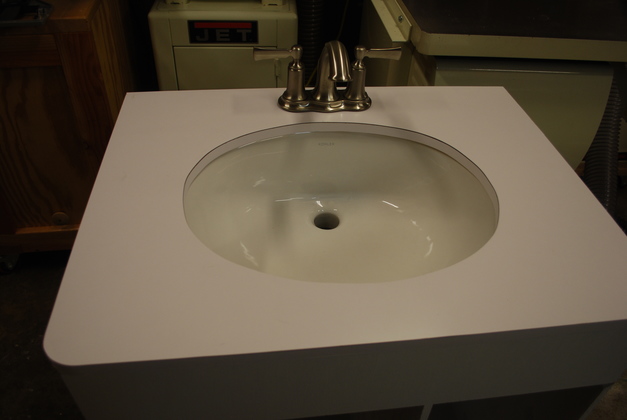
| Top with faucet. |

| Lumber, marked and ready to be sawed into drawer frame pieces. Please see my page on making drawes. |

| Resawing boards into drawer frame pieces on the bandsaw. |

| Sides and back after resawing. |

| Drawer frame pieces rabbeted for bottoms. |

| Dovetail jig stored in storage bay of sander bench. |

| Dovetail jig setup. |

| Dovetails being cut. Close look at dovetails in jig. |

| Matching dovetails on frame pieces. |

| Drawer frame dovetails test fit. |

| Drawer being glued, note the ClampIts in opposite corners to ensure square. |

| Close look at a dovetailed corner. |

| Drawer frames glued, upside down, ready for bottoms. |

| You can see the rabbets for the bottoms at the top edges. |

|
1x2 drawer front frames cut to length, mitered, and slotted for type FF biscuit.
|

| Front about to be glued. Note I use a self-centering pciture frame clamp to glue the frame. |

| Drawer fronts in glue clamps. The smaller top drawer was too small for these clamps so I had to use bar clamps. |

| Glued drawer front. |

| Gluing in panels to drawer fronts. |

| Gluing an insert to back of front panel to give a better attachment to the drawer. This isert makes the panel flush with the frame. |

| Drawer front being glued to drawer. I used type FF biscuits to attach the front to the drawer frame. |

| You can see the insert lining up with the top of the drawer frame. |

| All three drawers (laying on their left side) along the work bench. |

| The top drawer, ready to paint. |

| Drawers, mounted and painted in the vanity. |

| Drawers in the vanity with pulls. You'll note, since the drawers are low I put the pulls at the top of each to make them easier to reach. |

|
I needed drawer pulls for the drawers and slider so I made them from pine.
Please see my page on how I do make drawer pulls.
|

| The full 1-1/2 x 1-1/2" square strip with the 3/4 x 3/4" rabbet cut. |

| Now I round the top and front edges of the strip. |

| Next, I cut it into 4" long pieces for the individual handles. |

| My handle corner rounding holder. I use the router table with a roundover bit and hold them with this gadget. Please see my handle making page for more details. |

| End of pull (handle) with corners rounded. |
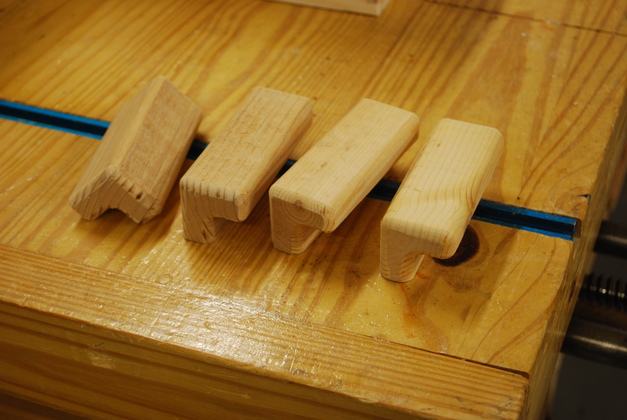
| Drawer pulls ready to paint. |

| Slider frame pieces, cut out, on the bench ready to dovetail. This slider is different from other sliders I have built in that the frame is like a drawer (has sides). Please see other slider projects. |

| Slider frame pieces clampted in the dovetail jig. |

| Close look at slider pieces about to be dovetailed. |

| Slider frame assembled. |
| Close look at half blind dovetails. You can still see a little bandsaw mark from the resaw, but its on the outside of the drawer. |

| Slider frame glued, upside down ready to glue in bottom. The bottom is 1/2" thick in this slider so you can see the very deep rabbets cut for the bottom. |

| Bottom glued in. |

| Look at frame corner and bottom. |

| See how the bottom is flush with the sides. |

| Slider front in glue clamps. |

| Slider front panel being glued. |

| Reinforcing and glue stips glued in. The strip on the right matches the top of the drawer frame and the strip on the left is for the pull. |

| Drawer frame being glued to the front. |

| Drawer bottom and outsides painted. |

| Front panel being painted. |

| Front panel frame painted clear. |

| Vanity with all drawers and slider mounted. |

| Slider opened. |