|
|
| 
| ||||
|
|
|
| ||||
I originally tried this dust detector but it wasn't reliable, so I made Dust Detector 2 which is much more reliable.
When I added the 6" cyclone to the large dust collection system, I added a 33 gal garbage can for a dust bin. I had no way to determine when this new dust bin is full. I thought of a window in the side but the bin is not visible most of the time. Oneida has an Infra Red dust sensor for about $150. Once upon a time, I could do things like this, I decided to build a dust sensor of my own.
I tried an inexpensive IR (Infra Red) emitter/sensor pair and was disappointed, in it's sensitivity and stability.
It's possible that inexpensive is the key word and reason for flakeyness there.
So I decided to try ultrasonics (also inexpensive).
The ultrasonic distance detector (HC-SR05 aka. VMA-306) was about $4.
The VMA-306 (HC-SR05) Ultrasonic Distance Detector has an all digital interface, I think it was made for robotics, used for detection of near objects.
The distance detector has an internal bandpass filter and returns a digital echo pulse the width of which indicates the range to target.
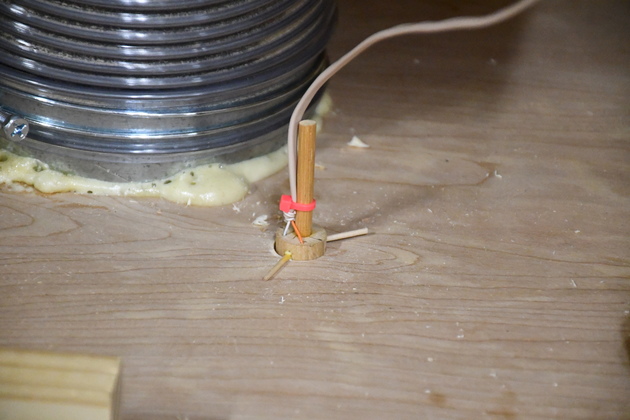
The only concern about this ultrasonic emitter/detector is it is very narrow beam of sound so if the dust pile isn't directly under it the reflected sound may veer off to the side and not return directly to the sensor.
I want the best alarm annunciator so I won't miss a full dust bin, I have found is a 12 Volt siren/light (as long as it's draw is less than .5A) for alerting on bin full.
The amazon unit uses 12V @ 280 MA, well within our requirement and siren as well as bright lights (Red), you should be able to at least hear it even though you have you earplugs in.
This thing will wake the dead.
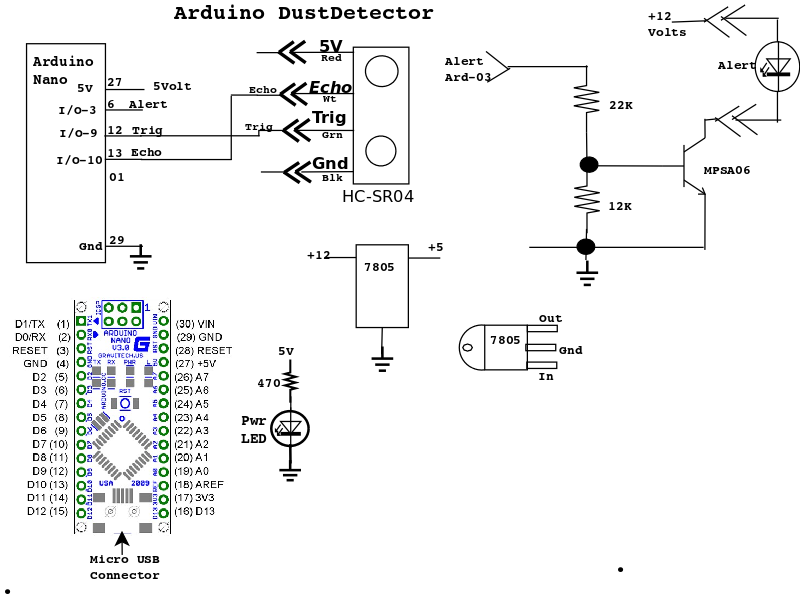
I guessed at the current drawn by the anunciator and scratched out a circuit.
I used a 12V, 1 Amp switching (not magnetic) wall wart (power adapter).
BTW: I power the unit from the same power as the DC so it stops screaming when I turn the DC off.
I went to Mouser.com for electronic components.
All the parts I bought were reading right to left (cheapest) and in stock (at the time) (5% caps and resistors), so far I'm out about $25 for the electronics including the alarm.
You choose what kind of anunciator you want just so it runs on 12volts and draws less than .5 Amps and is loud and bright.
The MPSA06 can carry 500MA.
I also chose the largest parts (physically), I wasn't using a PCB so I didn't want to use surface mount devices (SMD).
Another thought: in watching the videos of the $150 Oneida Dust Detector in action, I noticed the warning light flashes a whole lot while dust is flowing around in the dust bin. I assume this is because of dust clumps or particles randomly reflecting back IR while the dust is swirling around in the dust bin. This bugs me, flashing should only happen when it alerts!
After some fumbling around I discovered that the AWS-306 (HC-SR05) uses echo pulse width to indicate distance to object.
And after further fumbling around I decided to try an Arduino Nano, 3 terminal regulator, NPN switching transistor, and a small prototype perfboard.
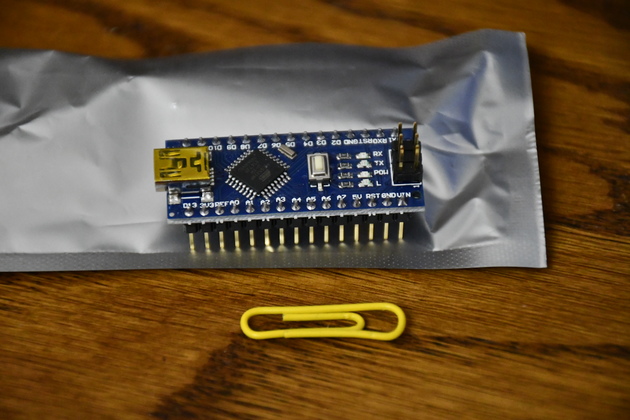
One of the nice things about a Nano, it can be powered from a 5v phone charger, including the tiny wallmount USB adapter and a mini USB cable but the anunciator needs 12 volts.
I didn't use the screw terminal adapter in the final system, I used a PCB from Amazon.com, I bought 32 PCBs because I thought I would do other projects with the Nano later.
I bought an Arduino Uno to play with (debug), then an Arduino Nano to actually imbed in the dust sensor. I downloaded the Arduino IDE on to my Ubuntu (18.04 MATE at the time) then the SR04 test program. Pick the IDE for you operating system (Linux, Mac, or Windoze). You can download the "Sketch" by clicking here and click save. The IDE proved to be great, the Arduino programs in 'C', so I had no problem with it, I just needed to learn some basics on this particular computer. I used the test program as a guide and built my dust detector program (sketch). The program (or sketch) is below.
After installing and getting this running I am pleased with the results.
The light doesn't flash while it runs.
I'll know more when It does come on.
BTW: This led to my getting interestd in Robotics and several projects.
After running it for a while, when the trash bin is getting close to full, the annunciator starts to flash, I'm assuming the trash bin contains swirling dust which occasionally reflects enough to momentarily rise above the threshold.
I am changing this detector to work with the Automated Dust Collection System. I'll no longer use the annunciator, instead the Dust Auto system will stop the Dust Collector and display "Dust Bin Halt" on the data terminal. The Dust Detector will send the current dust distance to the Dust Auto System so I can see at any time and empty the bin before it halts the system.
|
|
Click here for a downloadable copy
/***********************************************************************
* Arduino Nano "Sketch" for DustDetector
* Ultrasonic Sensor HC-SR04
* mark and paste into Arduino IDE
***********************************************************************/
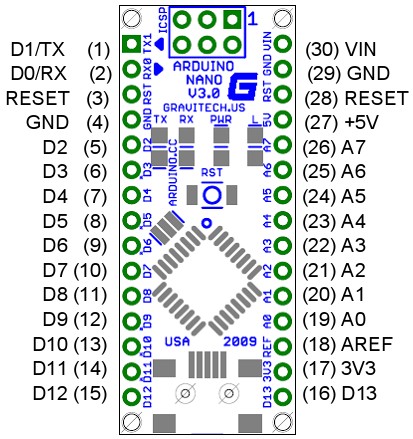
// DEFINE NANOs PIN NUMBERS
#define TrigPin 9
#define EchoPin 10
#define AlertPin 3
#define DISTANCE 8 // SETS DISTANCE, IN INCHES, FROM TOP DOWN TO DUST PILE
/*F**********************************************************************
*
**********************************************************************/
void
setup()
{
pinMode( TrigPin, OUTPUT); // SETS TRIGPIN AS AN OUTPUT
pinMode( AlertPin, OUTPUT);
pinMode( EchoPin, input); // SETS ECHOPIN AS AN input
digitalWrite( AlertPin, LOW );
}
/*F**********************************************************************
*
**********************************************************************/
void
loop()
{
int dist;
long dur;
digitalWrite( TrigPin, LOW ); // MAKE SURE TRIGPIN IS LO
delayMicroseconds( 2 );
digitalWrite( TrigPin, HIGH ); // SET TRIGPIN HIGH
delayMicroseconds( 10 ); // WAIT 10 US
digitalWrite( TrigPin, LOW ); // SET TRIGPIN LO
dur = pulseIn( EchoPin, HIGH); // RD ECHOPIN, RTRN ECHO TRAVEL TIME US
dist = dur / 148; // CALC DIST: INCHES (SOUND TRAVEL 1" IN 148US)
if( dist < DISTANCE )
digitalWrite( AlertPin, HIGH ); // TURN ON ALERT
else
digitalWrite( AlertPin, LOW ); // TURN OFF ALERT
delay( 1000 ); // 1 SECOND OVERALL CYCLE TIME
}
|
A Nano on top of it's packaging. I put in the paper clip to give you an idea of how small this thing is. The paper clip is 1-1/16" long. |
|
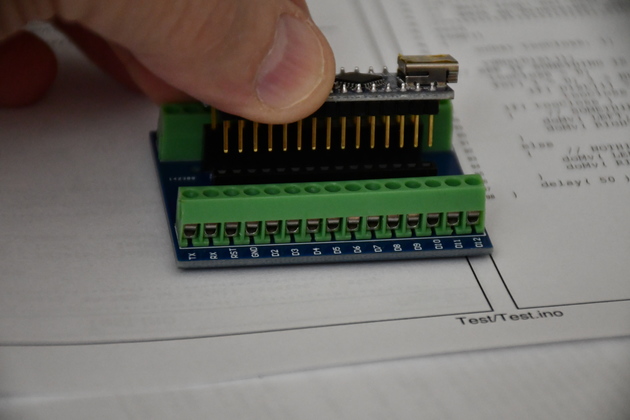
Aligning the nano and the expansion board. |

|
Prototype with blue led on (I'm standing close). |
|
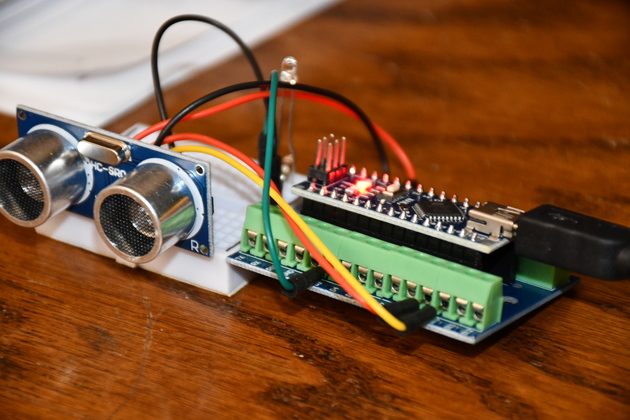
Prototype: you can see the Nano on top of the screw terminal expander shield and the solderless breadboard with it's HC-SR04 and the led. |
|
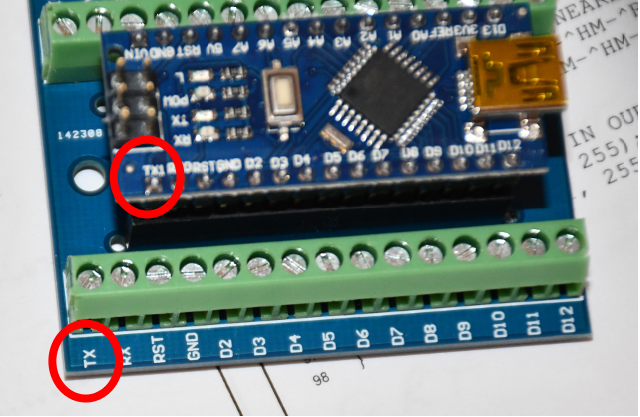
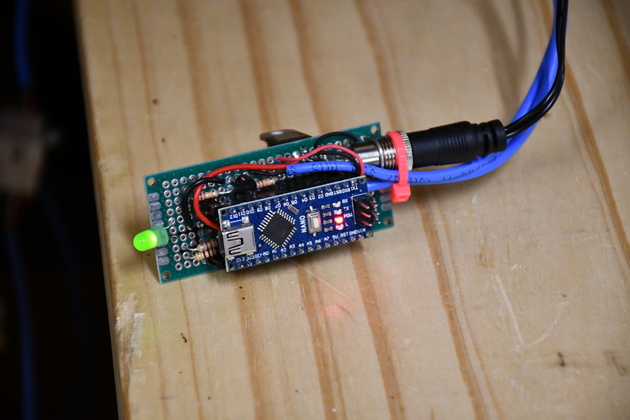
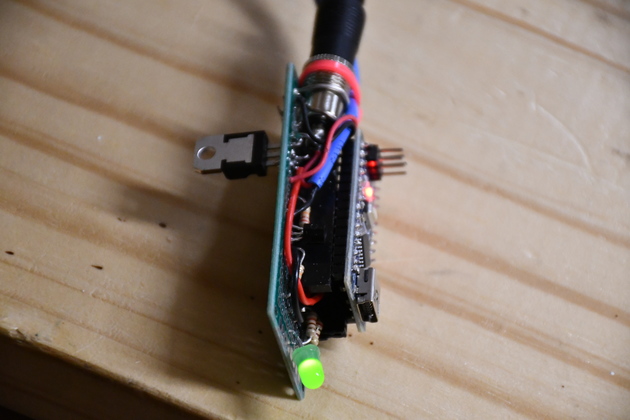
As you can see I made a breadboard for the Nano, soldered a couple of 15 pin female Berg strips, then added the 3 terminal regulator, the transistor (with two resistors), and power connctor. |
|
In this shot, the three terminal regulator is on the bottom (probably should have put it on top), the resistors, and LED on top along with the Berg strips (they call them headers nowadays). |
|
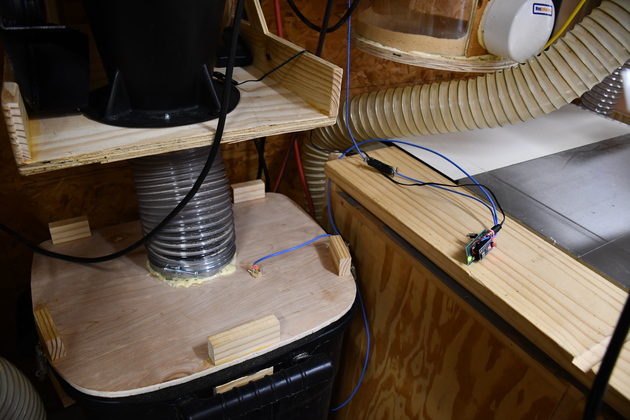
The control board hooked up but not in it's box yet. |
|
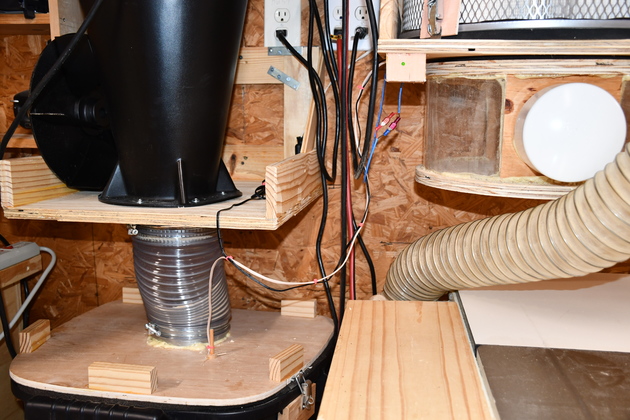
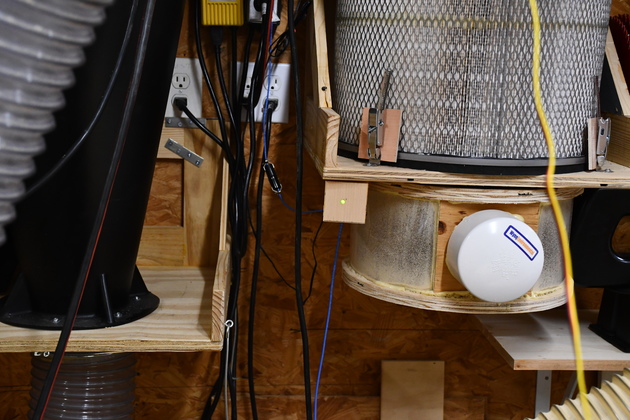
You can just barely see the green LED on the control box under the filter, left of the clean out box. Note the Alert light is NOT on. I'll try to remember to get pics when the dust bin fills up. |
|
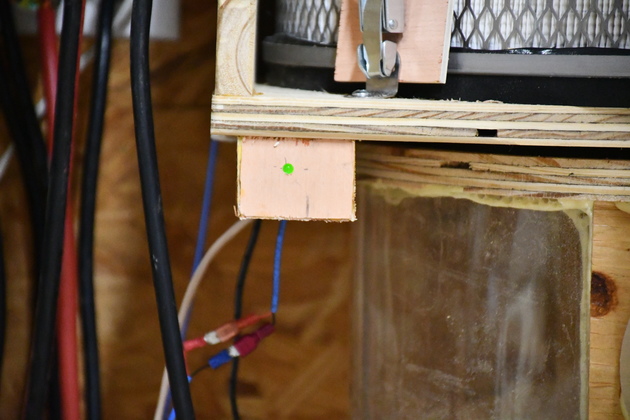
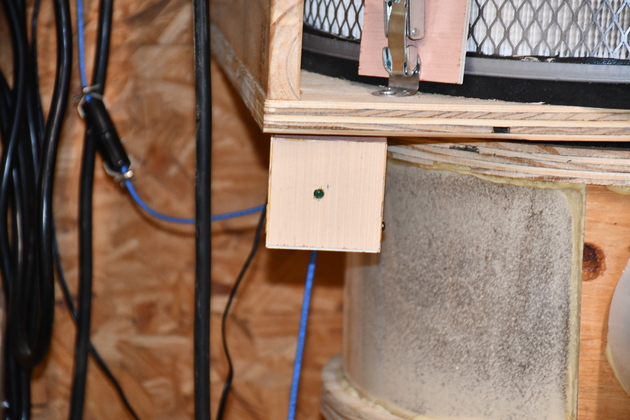
Closer look at the control box, you can see the green LED is lit. The LED runs on 5volts out of the 3 terminal regulator. |
|
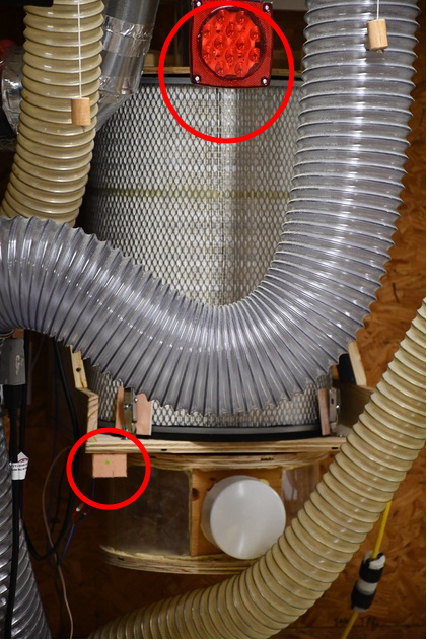
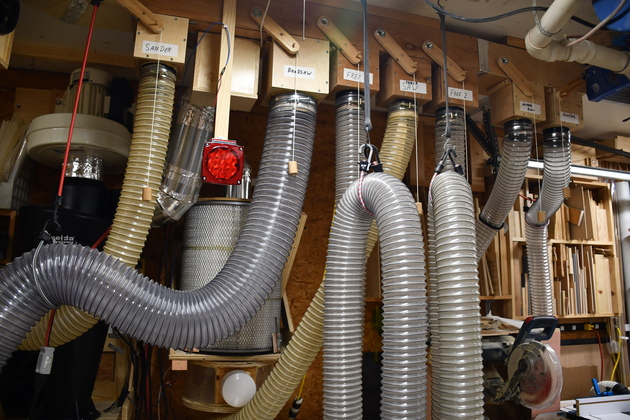
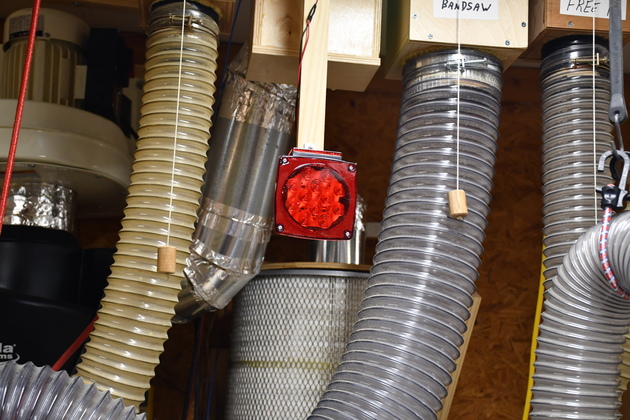
You can see the alert light hanging from the ceiling. Note the filter behind the alert light and the cyclone to the left. |
|
Closer look at the alert signal (LED boat trailer taillight). |

|
|