05/02/15: Moving the DC-1100 to the Ceiling
And Added a 5 Port Plenum with Modular Valves.
09/05/12: After About 1 Year Of Operation
<=== NEW
07/02/12: Add Cone Calculator.
06/01/12: Add a "Solution" paragraph.
03/28/12: "Tweaked" some text.
02/25/12: Change "Next Step" to Fitting Wynn Filter, added links.
02/16/12: Added pics of entire DC.
12/06/11: Added pics of the dust hill in the bag.
10/17/11: Added the Brim to the Tin Man's Hat.
10/15/11 and 10/16/11: Cleaned this up to make it simpler.
Any questions or comments about these pages, my name is Paul Turner, please email me at  .
.
Jet DC-1100C Dust Collector Description
The DC-1100C consists of the blower and the vertical section.
The vertical section consists of the filter on top, a crude separator in the center, and the plastic collection bag at the bottom PIC.
Air and dust is drawn in by the blower's impeller, forced into the side of the separator where large dust particles should fall into the clear plastic bag and the air along with fine dust particles goes up and are caught by the filter.
The filter traps the fine dust and the plastic bag gets all larger (visible) sawdust chips.
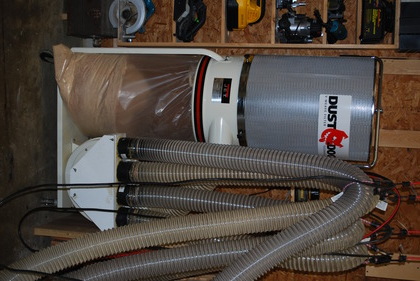
Pic of My entire DC-1100
Jet DC-1100C Dust Collector Problem
I recently became alarmed at how quickly the suction drops when the canister filter on the DC-1100C becomes clogged.
There was a 1" - 2" thick thick layer of sawdust chips completely clogging the inside surface of the filter.
Most of the clumped sawdust in the canister could be knocked out with the paddle in the Jet's cartridge, but that doesn't do much to remove the stuff inside the pleats and I found the sawdust immediately returned when I ran the DC.
These canisters cost over $300 and have to be cleaned and replaced very often.
After some research I decided the separator wasn't working as well as I needed due the basic DC-1100's separator design.
I also researched Cyclone separators in general, wood chips and most fine particles should end up in the collection bag and fine (micron and below) dust should end up in the filter.
During my research I discovered some mods to similar collectors that appear to help the separator function correctly.
There are two mods which look good (Swirl Vane, and Thien Baffle) and a third (a collar with a swirl vane would more closely approach a cyclone) which I thought was a good idea but the guy on the web said it didn't work.
The way folks tested their mods was to run the DC then stop it and bang on the side of the filter watching to see how much saw dust fell out into the clear catch bag.
This was OK except for the Thien Baffle which would proably have a vortex on top thus a deposit of saw dust on top.
It occurred to me that you might add a cone on top of the Thien Baffle to allow the dust to fall out but what would the cone do to the air flow?
I did some research and discovered that some cyclones have cones in then at the bottom of the separator, above the cone shaped accelerator (my term).
As I was considering these I discovered the Jet "Vortex Cone" (cone shaped Thien Baffle).
The demo video on the Jet site was interesting, it featured two identical Jet DCs one with the cone and the other without, running side by side for the same time
, then they removed the filter on each to show the presence of lots of sawdust on the unconed and no sawdust on the coned DC.
I realized that the demo didn't show a lot of new sawdust being collected and the catch bags contained very little sawdust, but it was still better than what I had.
What Jet Said
I called Jet and asked if I could buy an upgrade, they said NO.
I then asked if I could buy the parts (I had downloaded one of the new manuals and it listed the cone part as well as a package of all parts required, nuts, bolts, bracket), and again they said NO, its not for sale.
I asked the Jet support person if I owned one of the new DC-1100vx and a part broke could I get a replacement and he said yes!
It would appear that Jet wants me to just discard my current DC and buy a brand new one, or just keep buying $300+ canisters frequently with even more frequent filter cleanings.
None of these sounds very good to me, in fact unacceptable.
I am curious what Jet is really thinking?
I think Jet is remiss in not offering an upgrade for all it's older DCs.
I just hope if they do offer an upgrade, that the price is reasonable (less than $100), since building a cone costs less than $20 if you had to buy all the parts.
The Solution
The Thien baffle is probably the simplest fix (also for Harbor Freight), but I wanted to try the cone to avoid the possibility of dust build up on the top side of the baffle and since it is easier to attach.
After looking at the final result, the Thien baffle should work about as well as the cone, there should be no worry about build up in either case.
Once upon a time I was an electronic engineer, so math is no problem for me, but in order to make this easy for the Grizzly, Harbor Freight, and Delta guys i'll hide the trig so most folks can easily fit one to their DC.
BTW: I chose a cone height that would keep the bottom edge of the cone above the place where the collection bag top edge is, to avoid cutting the bag or me when changing it.
I have received email from a couple of guys who modified their DCs, one used a Wok, the other used an old frying pan (apparently one of the teflon coated ones) and both worked great.
I think as long as it is close to the right diameter, you'll be fine.
Turbulence
If you look down from the filter (and the top of the cone) the air rotation in the DC-1100 is clockwise so I would suggest that if you make the cone from the pattern I show, with the overlap flap on the right, when you form the cone, with the seam nearest you, make the overlap flap on top of the other side of the cone.
Always make your pop rivets as tight as possible and their heads (part that goes next to the tool) on top of the cone.
Also you may want to use 4 rivets just to keep the seam tight.
Another thing, when attaching the bracket, use round head bolts and put the heads below and the nuts on top as I picture.
This provides a little less turbulence in the high velocity (97 MPH) separator area, below the throat.
Determine the size etc.
I took my DC-1100C apart and did some measuring on the separator, I also went back and looked at the Thien Baffle, and carefully viewed the demo video and the down loaded assembly manual for the new DC-1100vx.
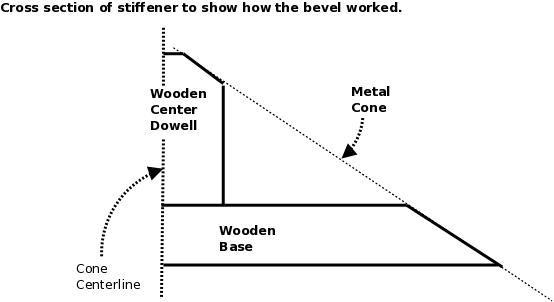
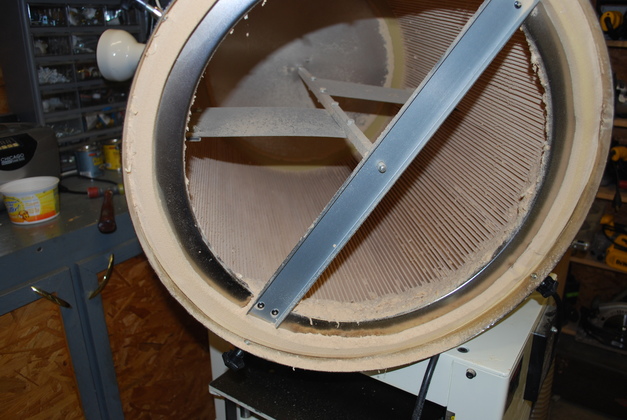
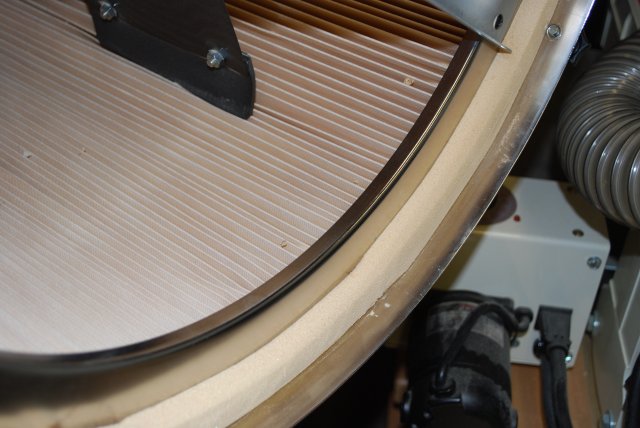
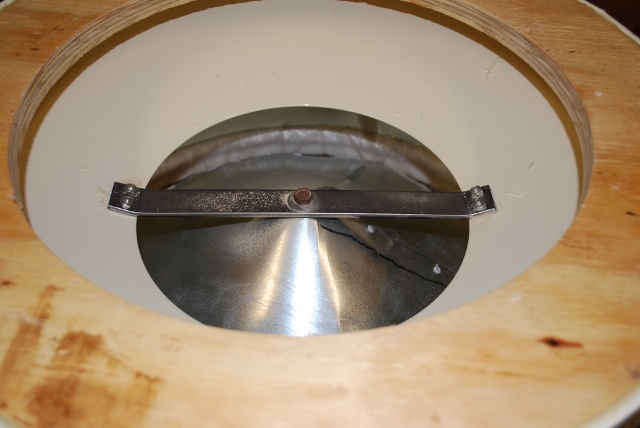
The cone is in the separator area, it's top tip touches the bottom of a flat metal bracket that is across the throat.
The bottom of the cone appears to be just above the snap ring that holds in the collection bag and the bottom edge appears to be about and inch to an inch and a half inside the inner wall at the top of the bag snap ring.
I measured the inside diameter of the separator as 19" inside the bag retainer ring, with 1-1/2" space around the edge of the cone this would imply that the cone is 16" wide at the bottom and 5 1/2" high.
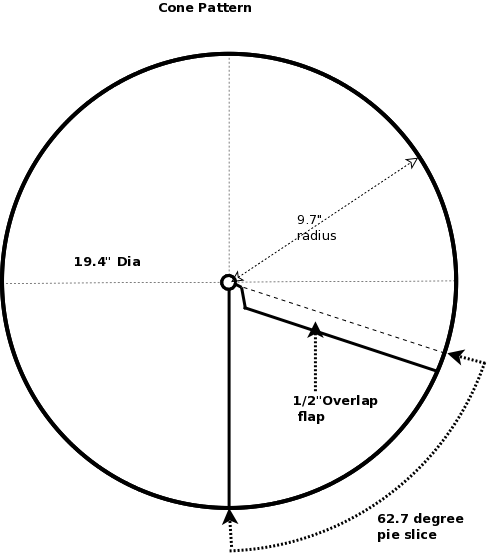
I calculated a 19.4" diameter circle for the cone pattern with a 62.7° pie slice missing (except for the fold overlap, please see the cone pattern below).
Please go here for how to calculate this
or I'll calculate it for you with step by step instructions.
The Parts
Off I went to Lowes (since Home Depot screwed up thier web site so Firefox doesn't work I mostly go to Lowes) to buy some metal duct pieces, I bought a 7" and 8" X 24" pipes.
The two pieces of pipe cost about $10 which, which was my cash outlay (I had the 4 bolts, one lag screw, pop rivets, stiffener wood pieces, and a piece of flat metal strap laying around).
I cut off the embossed male end of the 8" pipe, flattened the remaining tin out, drew diagonals from the remaining opposite corners, making a small nail dent at the crossing (center) then drew a circle with a 9.7" radius.
If you don't have a large beam compass please see Drawing The Circle
or you use a Chord, if I didn't screw up the math this should be close.
Using one of the diagonals as one side, I drew the pie slice of 62.7° then added the 1/2" overlap piece to the drawing.
On one edge of the pie slice I added a 1/2" flap to provide an overlap to attach the two sides of the cone together.
I cut out the pattern with tin snips then went around all the cut edges with a moto tool and a small stone to remove the sharp edges.
I formed the cone and riveted it together, then cut off the very tip so I would have about a 5/16" hole for attachment.
It would be easier to form the cone if I drilled a 3/8" hole at the center of the pattern after I marked the pie slice and overlap flap and before I formed it, but I was in a hurry.
The 3/8 would reduce to about 5/16 when the cone is formed.
When you center punch and drill the tin be sure and support it from underneath (I used a piece of wood).
I chamfered the holes with a larger drill bit, lightly, from the bottom.
Forming the Cone
I used gloves every time I handled the tin and I would suggest anyone who does this do the same.
I brought the two outer corners of the cone together making sure I had the flap overlapped the correct amount then clamped the overlaped area near the bottom leaving room for a rivet.
Next I center punched a hole very near the outer edge of the overlap, then drilled a 1/8" hole through both layers and pop riveted that joint.
I could have measured, center punched, and drilled while the tin was flat, but I was in a hurry and making a support (last) was easy.
Then I set the bottom of the cone on a flat surface and with both hands brought the rest of the overlap into it's correct place.
While holding the formed cone with one hand, I center punched the remaining rivet holes supporting the tin with a piece of wood clamped in my bench's vise.
Again while holding the cone in position with one hand I drilled 1/8" holes for the remaining rivets supporting the tin with the 2x2.
Then placed pop rivets in the holes and do the pop rivet tool thing.
Cone complete.
Cone Stiffener
I wanted the cone to be stable in the wind (about 97 MPH) pressure without vibrating or deforming so I built a "cone stiffener" out of wood.
I cut a 2 1/4" long piece of 1-1/4" dowel then center drilled a 1/4" hole in the top of the dowel and two 3/32" holes in the bottom.
To be more precise, the center dowel should be 2 1/32" since we want a 5/16" flat on top, but I left about a 1/4" flat on the bottom of the base disk so it came out OK.
I cut out a 8.72" diameter disk from 3/4" plywood and attached the dowel with two wall board screws into the 3/32" holes.
I sanded off the top edge of the disk and the dowel to about 34.5° so the "stiffener" would fit snugly inside the cone's top.
I screwed two small blocks to the bottom of the stiffener base so I would have a "handle" to hold while tightening it to the bracket (I'll get pics next time I have a chance).
Mounting Bracket
I made a mounting bracket out of a piece 1" wide and 11" long steel strap.
The throat is 9.5" in diameter so the 11" length provides 3/4" overlap on each end of the bracket.
I bent the edges up slightly to match the separator throat angle, then drilled 2 holes in each end for mounting serews.
I put the bracket in the throat and measured the distance from the bracket center to each side of the throat and moved it until it was in the center.
I could also have made a paper pattern by cutting a circle the diameter of the throat, folding it in half then using that to make center marks.
I marked and drilled a pair of mounting holes to match the bracket's holes.
Then I mounted the bracket and put the 5/16" lag screw through it into the stiffener inside the cone, tightened it and put the DC-1100C back together.
I cleaned the filter and throat before reassembly.
And, Voilla, it works, and with a 40% full catch bag.
I started the DC and noticed the dust whirling in the catch bag was in the bottom half of the bag and spiraling down instead of swirling in the entire bag.
Then I dumped a bunch of dust accumulated in my miter saw's shroud into one 4" input.
When I stopped every thing and banged on the filter, nothing fell.
Next I carefully removed the filter, no dust fell out, there was no dust on top of the throat, or piled up around the bottom of the filter.
Success
Now that it works correctly, the Jet DC-1100 is a very good compact DC system, it takes up less space than most of the cyclones I have seen and works very well with no filter clogging etc.
This cone may not be perfect, but it sure beats what I had going with just the Jet as it came from the factory!
The total cash outlay was about $15.
I'm not sure why it works, but the pics don't lie, it does work, I just wish Jet would sell them to DC-1100C owners, hopefully Grizzly, Harbor Freight, and Delta will sell them as retrofits.
It wasn't hard to build as I've shown.
I hope I've given enough info for the Harbor Freight, Grizzly, and Delta owners to try one.
Any questons please email  .
.
11/12/11:
After running the DC a lot and putting a lot of chips / dust into it I took the filter off again and still no accumulation on top of the throat or in the filter.
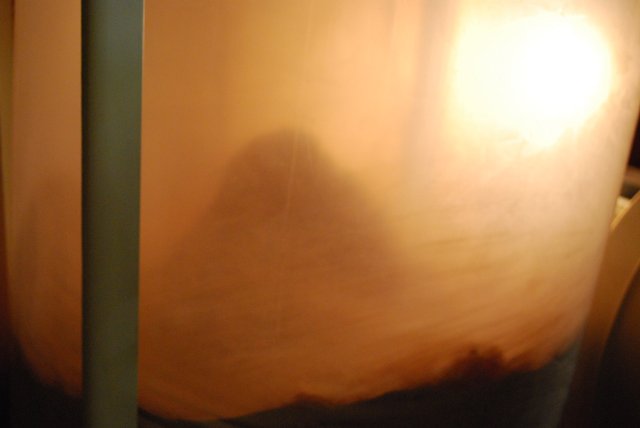
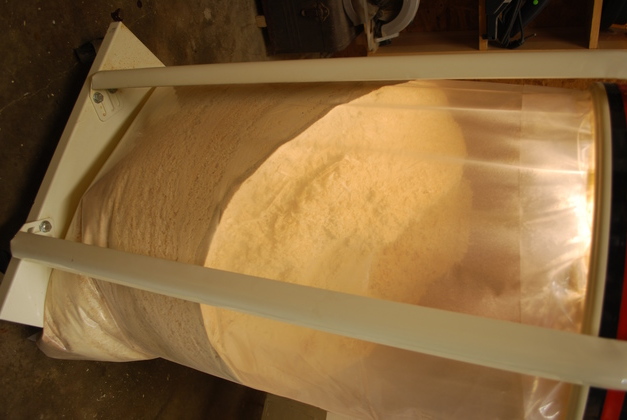
Another observation, the sawdust / chips seem to pile up and form a peak, or hill, in the center of the catch bag
If your interested heres the arithmetic I used.
One other thing I did to the DC-1100 was replace the 6" to dual 4" 'Y' with a plenum.
Next Up for this project: adding the Wynn filter still under construction.
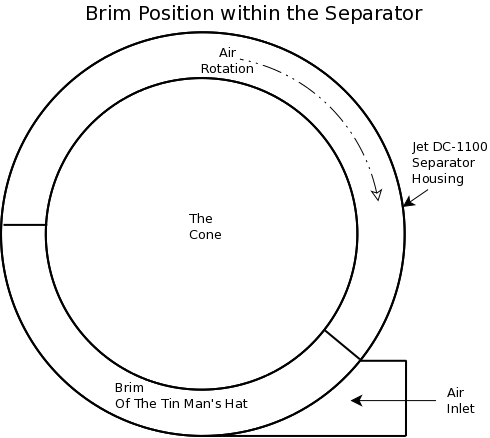
Brim for the Tin Man's Hat
I called it the Tin Man's hat after the Wizard of Oz Tin Man who actually had an inverted funnel for a hat, but this reminds me of it.
After trying it I noticed a lot of dust whirling around in the bottom of the catch bag, so I decided to try the edge of the Thien baffle (the 120° part), and built a brim to the Tin Man's Hat.
The cone is 16" in diameter and the separator is 19 1/2" so I cut a curved piece of tin with the above radii (8" & 9.7") and 120° arc with 1/2" tabs on the inside.
I folded the tabs up at about 34° and put in 5 pop rivets.
Please take a look at the Brim.
I positioned the brim to start just before the inlet in the separator.
|
|
|
|
|
Using a chord to mark the pie slice:
|

|
Marking the pie slice: the chord of 62.7° and 9.7" radius is 10".
Starting at the place where one of the diagonals crosses the edge of the circle, measure where 10" again crosses the edge of the circle, mark this place and draw a straight line back to the center (dent).
This is the basic 62.7° pie slice, now add a 1/2" overlap flap.
|
|
My Jet DC-1100C.
This is after the tin man's hat is installed with brim, (before the Wynn Filter), notice the dust "hill".
You can also see how the 4 way plenum fits on the front of the blower.
Note the three sections: top is the filter, middle is the separator, and bottom is the collection bag.
|
|
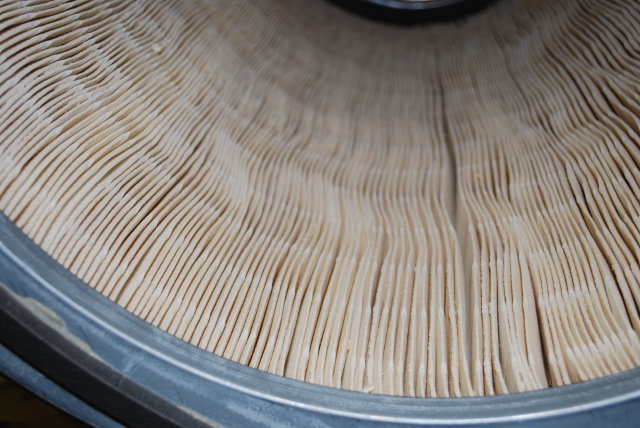
Before cone installation, you can see the beginning of accumulation of dust in the filter since it was cleaned last week.
At that time there were huge globs of sawdust, chips, and shavings 1/3 of the way up into the filter which was clogged by the large particles.
This is the original Jet filter ($$$$), note the vertical shaft with paddles and support bar across the bottom, this was to knock these particles lose so they fall into the chip bag (or on top of the separator throat).
|
|
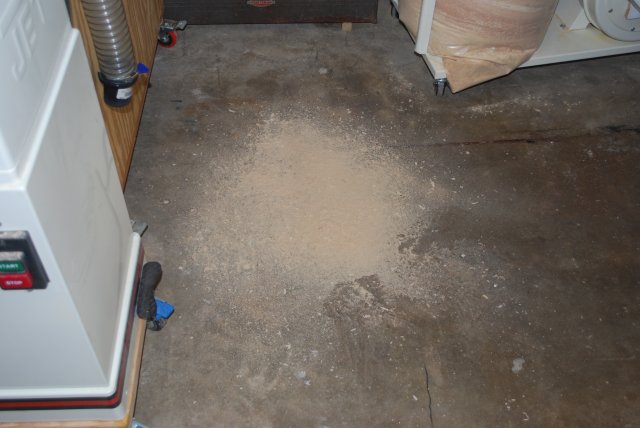
When I removed the filter a lot of sawdust fell out on the floor..
|

|
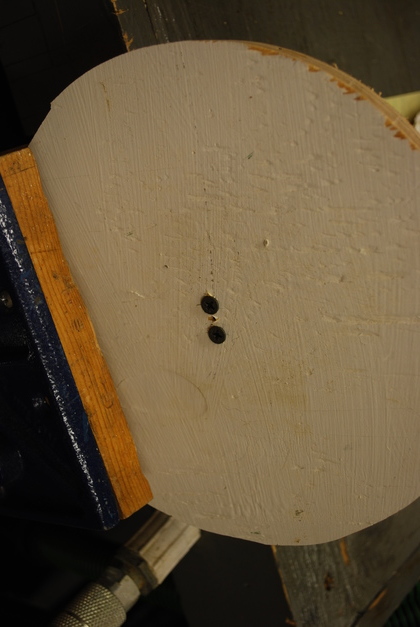
See how much was accumulated on the top of the separator throat, this should be in the chip collection bag.
|
|
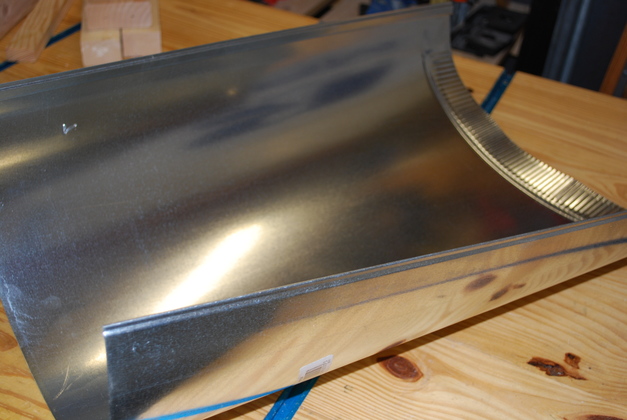
An AC pipe as it comes from Lowes.
The embossed part on the right would have been the male part to go into another pipe section.
This pipe is an 8" by 24" and cost about $5.
|

|
The embossed part cut off along with one of the rolled edges.
|
|
Pipe after trim ready to mark and cut.
|
|
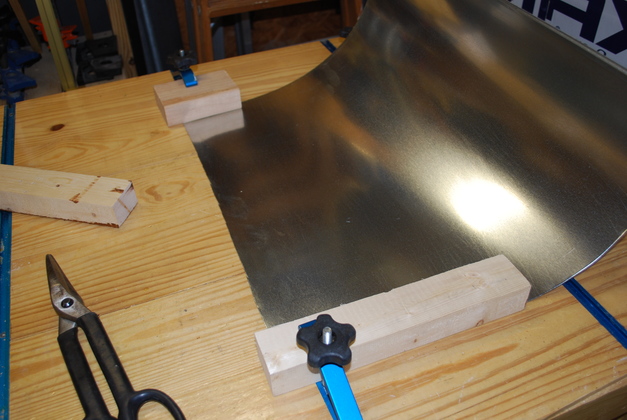
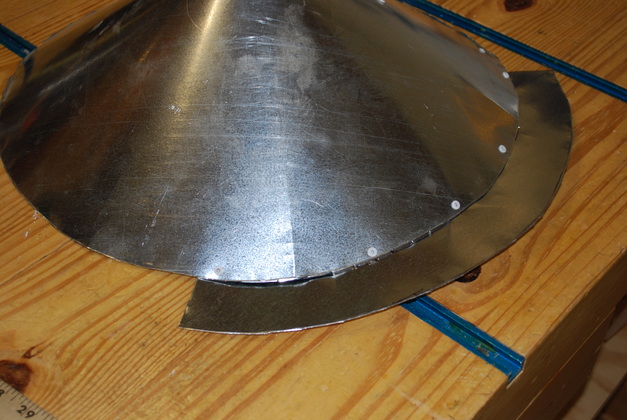
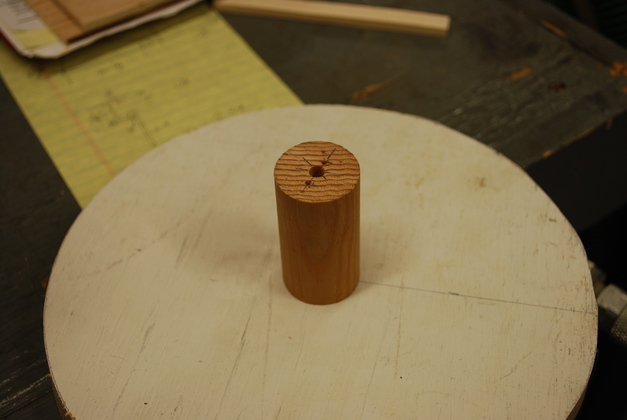
Top of the cone (AKA Tin Man's Hat).
I used pop rivets to hold it together.
|
|
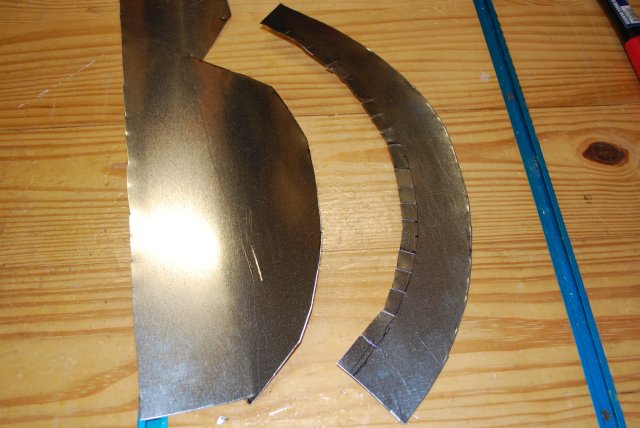
Brim cut out.
Note the extra 1/2" slotted area I added on the inside to bend up as attachment tabs.
|
|
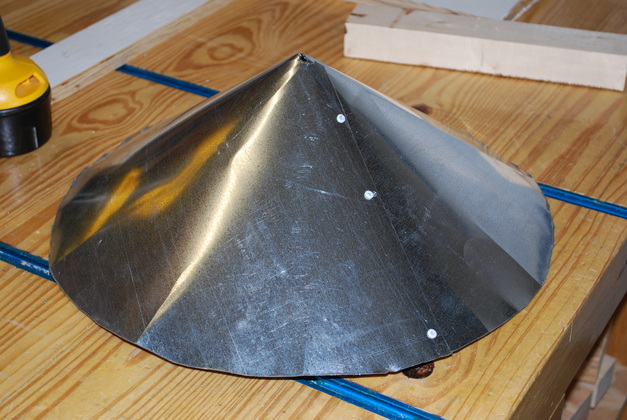
Brim on the hat (cone).
When you install the cone the air will curculate clockwise around it, as you look down from the top.
The far side of the brim in this pic, should be directly under the inlet pipe from the blower so the air is contained in the separator for about 1/3 of it's circumfrence.
This maintains the velocity and pressure so the dust is "slung" up against the outside of the separator, before the air is allowed to "leak" into the bag area (I think).
With this in place, and as the collector is running, you'll notice a small column of particles, starting at the end of the brim, spiraling down the inside of the collection bag.
|
|
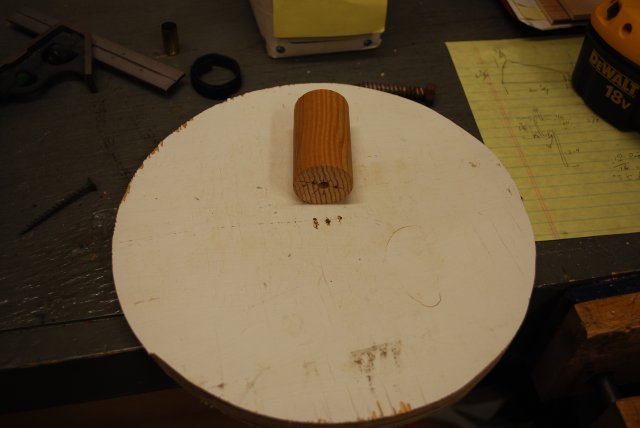
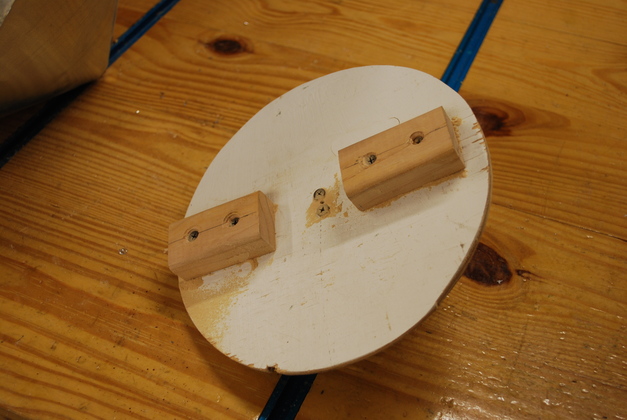
Stiffener parts.
|
|
Stiffener disk from the bottom.
Not shown, I later screwed two small blocks to this side of the base to use as a "handle" while tightening the 5/16" lag screw to the mounting bracket.
|
|
The top of the stiffener after assembly and before beveling.
|
|
After sanding the edge of the stiffener.
I used a 12" disk sander to bevel both of these.
The two bevels should line up and then match the inside of the cone.
The notch on the left is to clear one of the pop rivets.
|
|
The stiffener in the cone.
This straightens out any imperfect tendencies in the cone's metal and stabilizes it in the 97 MPH wind on top.
|
|
Stiffener "handles".
I had to take it apart to add the brim to the Tin Man's Hat so here is the pic.
|
|
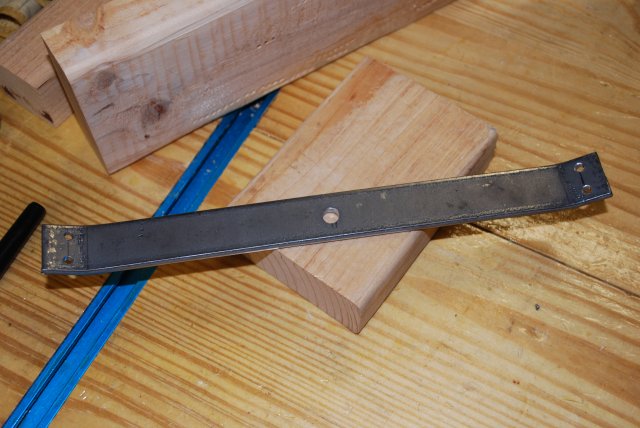
The mounting bracket is 3/4" longer on each end than the DC's separator throat (total of 11" long).
You can see the ends are bent up to match the separator's angle and two holes drilled for mounting screws.
Also note the 5/16" hole in the center for the cone mounting lag screw.
|
|
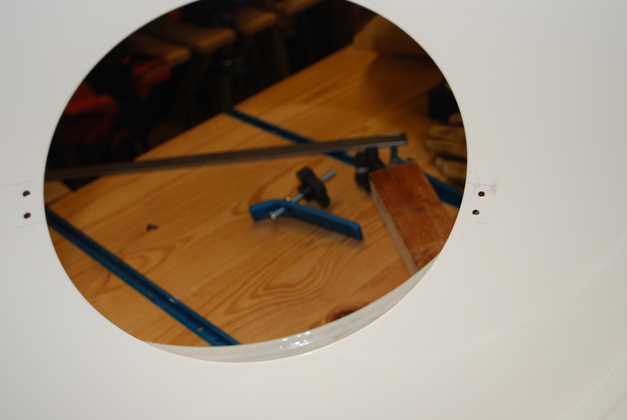
Bracket mounting holes at the sides of the separator throat.
It really is in the center even though it doesn't look like it here.
These holes are the only mods needed to the DC.
|
|
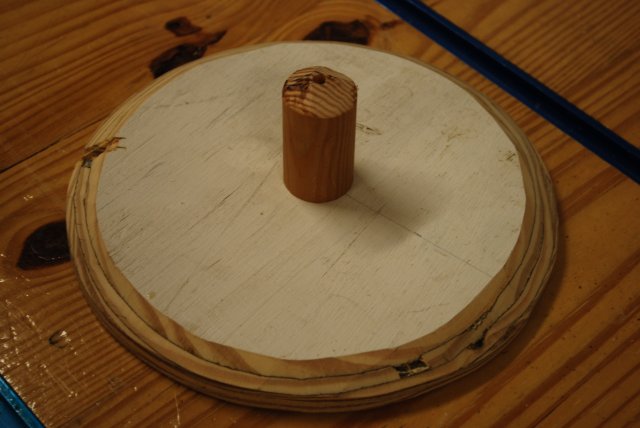
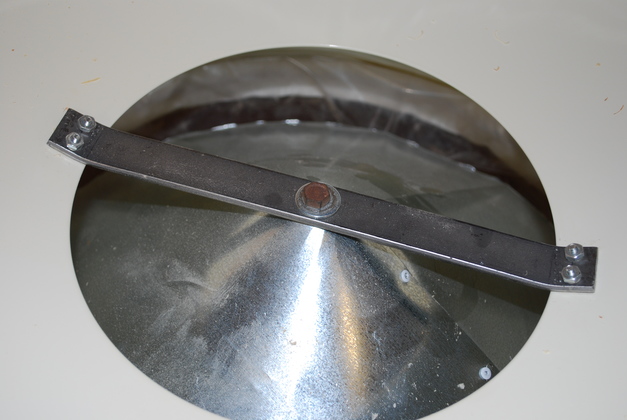
Finished, note cone snug up against the support bar.
|

|
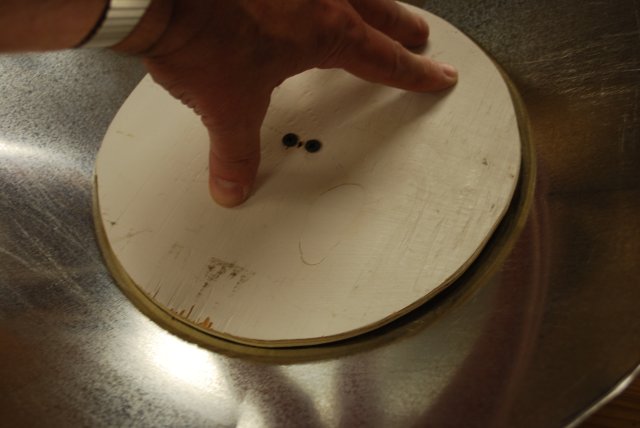
After running and dumping a lot of sawdust into a port then stop and remove the filter.
Note no accumulation on top of the separator throat and there was no fallout from the filter when I removed it.
|
|
Heres the filter after a lot of running.
|
|
When I run the DC-1100 with the tin man's hat, it forms a dust hill in the center of the collection bag.
Here it is with the collector running, you can see dust swirling around above the accumulation at the bottom of the bag.
The bag is a about half full.
It illustrates the hill building up in a relative calm area while dust swirls around the outside of the bag.
My guess about the laminar nature of the air flow in the bag must have been very close, but its intriguing how calm it must be in the center.
|
|
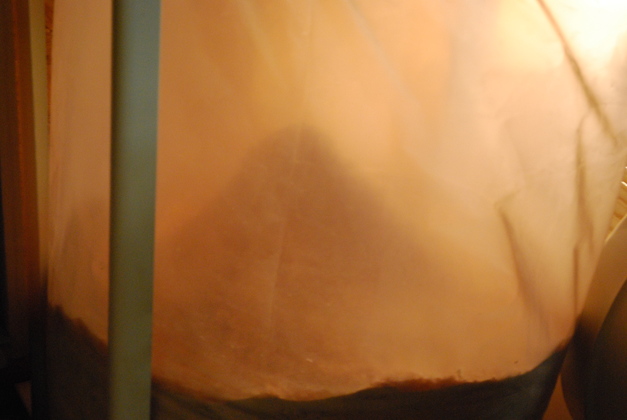
A shot with the DC off.
BTW: when I made these 'dust hill' shots, the collector had been used for two or three weeks with the cone in place, when I took the filter off there was still no accumulation on the separator throat or, visibly, in the filter proper.
|
The Arithmetic
I thought about it and decided I need to supply the arithmetic that I used so the Grizzly, Harbor Freight, and Delta guys can do this easier.
I think I have this set up so you don't need a scientific calculator (other than to take a square root) but just incase, most computers have a calculator app with a scientific mode and you have a computer or you wouldn't be seeing this.
Or you can use this square root tool on the web.
Deciding the Cone Dimensions:
I took the DC apart and measured the separator, the ID (inside diameter) is 19.5" but with the bag retainer band the air clearance is about 19".
I placed a 12" ruler across the separator throat (opening up to the filter) and measured 9.5" then measured the vertical distance between the throat and the top of the collection bag was about 5.5".
So the cone should be 5.5" high.
After looking at the Thien Baffle he left a 1.5" open area around 2/3s of the periphery of the baffle so I thought this would be a good starting place.
A 1-1/2" clearance on each side is 3" total so I set the diameter of the cone's base at 16" and had already established the height as 5.5".
Cone Pattern
We need to figure out how big a piece of metal we need, how big a circle to draw, and how big a chunk to cut out to form the cone for your DC.
A cone is a 3D object but if you look at it in 2D from directly above its a circle and from the side its an isocelese triangle (both sides equal).
Look at the isocelese triangle (side view of our cone) with the vertex (top point) up, it has a base of 16" and a heigth of 5.5".
if we drop a perpendicular from the vertex to the base we will divide the isocelese triangle into two right triangles.
The right triangle's vertical (opposite side) is 5.5" long and the adjacent side is 8" (1/2 the cone's diameter).
Now look at the right triangle on the left in the isocelses triangle, we need to know how long the hypotenuse (long side) is for our cone pattern.
Ole Pythagoras told us to add the square of the opposite side (5.5² = 30.25) to the square of the adjacent side (8² = 64) then take the square root of the result, so √(30.25 + 64) = √ 94.25.
Thus the long side is the square root of 94.25 or 9.7", this is the radius of the cone when laid out flat (the pattern).
So we need a circle 2 X 9.7" or 19.4" in diameter to make our cone.
I know, its a lot of arithmetic you haven't thought about in Xteen years, but try it, if you have problems, this form will do it for you, just fill in your cone diameter and height.
Drawing a Large Circle:
We need the radius because were gonna use a compass to draw the circle, if you don't have a large beam compass, use a stick, drill two holes (sized for a nail and a pencil) in it exactly the circle's radius (9.7" in my case) apart, put a nail through one hole into the dent in the center of the tin and a pencil in the other and then, holding the nail in the dent, draw a circle (BTW .7" is about 11/16).
The Pie Slice:
To make this thing turn into a cone we have to cut out a pie slice then bring the corners together.
The angle of the pie slice controls the height and diameter of the resultant cone.
The radius of the cone is 8" and the radius of the pattern is 9.7"
You normally take the ratio of the cone's circumference to the circle's circumference, but circumference is pi times diameter (2 times the radius), we can drop the constants pi and 2, so the ratio of the radii gives us what we need.
If we ratio the cone's radius to the patern's radius we get 8/9.7 or .824 (82.4%), this is the percentage of the patern to leave so 100% - 82.4% = 17.6% is the percentage of the circle to cut out.
Now multiply 17.6% (.176) times 360° to get 63.36° the angle in degrees to cut out.
The Stiffener:
One other small calculation remains, to determine the dimensions of the stiffener:
Remember the stiffener is a cone shaped object with exactly the same angles as the main cone, its just shorter and must fit inside the large cone.
We found that the triagular cross section of the cone half is 5.5" high and has an 8" base, so if we divide 5.5 by 8 (heighth of triangle divided by it's width) we have .6875, in trig they call that the tangent of the angle.
Since the cone is 5.5" high I decided to make the stiffener a little more than half that height or 3".
To get the radius of the stiffener base we take the .6875 from the overall cone and set it equal to 3 / X (the stiffener height divided by half it's base) and solve for X or 4.36 radius multiplied by 2 to get the stiffener diameter is 8.72".
Now I want to cut the base out of 3/4" plywood leaving 2 1/4" high center dowel to total 3".
I cut them out, center drilled the dowel, assembled the two pieces and used a 12" disk sander to bevel both edges at the same time (if your base diameter and height are right the bevel angle will be 34.5° same as the cone).
Interesting note:
a 1-1/2" gap around the edge of the cone has about 94in², the Thien Baffle has about 1/3 less than that (about 62.6in²), and the separator throat has about 71in².
I think I might have some clues as to how this thing works: the 5" duct coming in from the blower has a cross sectional area of 19.6 in² and the area above the cone has a cross sectional area of 36.5 in² according to Venturi the air velocity is going to be reduced by about 53% or the air goes from 91.7 MPH to 49 MPH but the chip velocity will slow more gradually, due to the chip's inertia.
This reduction in velocity will mean some of the suspended particles will be dropped and some others would be spun ("slung") off the edge of the cone, maybe.
I see air circulating just above the dust in the catch bag but not just below the cone so I know some of the rotation above the cone is going into the catch bag, but i'm still not sure how much air goes into the catch bag and returns and how it gets into the filter?
It must be some kind of laminar thing at the outside edge of the catch bag?
The separator must work something like this: air enters at 91.7 MPH at the edge of the cone and immediately drops to 49 MPH, then travels around, rising to the center where it goes up into the filter.
Meanwhile the particles in the air stream are directed at the edge of the cone at high veloctiy, and are slung out to the sides of the separator where they drop into the catch bag.
I assume the spining air at the bottom of the catch bag is an ineffeciency, maybe thats what the closed portion of the edge gap of the Thien baffle is for.
I notice the same spinning dust at the bottom on the Jet demo video.
I think the Tin Man's hat needs a brim!
Isocelese Triangle:
The isocelese triangle (the cone) may be broken into two right triangles by dropping a perpendicular from the vertex to the center of the base.
The perpendicular becomes the opposite side of the resultant right triangle, the part of the base at the bottom is the adjacent side and the sloped side is the hypotenuse.


|
After 1 year of operation, heres the inside of the Wynn filter on my DC-1100.
I had emptied the bag a couple of times, it was about 3/4 full each time.
|
|
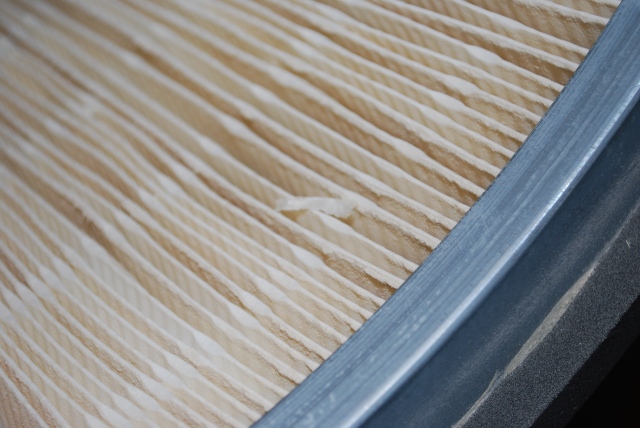
Closer look at inside of the Wynn filter,I saw 3 very small chunks of wood like the one in the upper left hand corner.
|
|
One of the chunks, close up, note no clogging of the filter, I assume there is some very fine stuff but you can't see it, thats what the filter is supposed to do.
|
|
The bag has been emptied several times, here it is a little less than 1/2 full.
This is the first time I've noticed the slope of the top of the dust.
|
|
Almost no chips on top of the donut or the throat, There are a few very small particles on top of the support bar.
Beats the heck out of what the Jet did before I modified it.
Off hand I'd say the cone (and baffle) are very effective at improving the Jet's separator.
|