
| 
|
|
Betty's Closet
|
10/03/14: Added links.
04/26/13: Some better pics and Adding Top Shelf.
07/17/11: Page Origin.
As I've said before, our house is tiny, so storage space if precious.
The front bedroom had a 59" wide and 30" deep closet with sliding doors, a vertical set of shelves 24" wide and 11" deep, plus a clothes bar about 30" long.
I started measuring and found we were only using about 30% of the available cubic ft. area.
So I decided to remodel it.
First I removed the sliding doors, tracks and face moulding.
Next I removed the vertical shelve section someone had added and the 30" clothes bar.
I measured and checked for square (it wasn't).
I built frame work for 3 sections the faced the whole closet opening with 1/2" brich plywood.
The 3 sections are:
|
|
| Top Section: 26" high with general storage area for large boxes etc.
|
| Center Section: 40-1/2" high with the clothes bar running the complete width of the closet and a center support.
Also a 7" deep storage area behind clothes for large flat items.
|
| Lower Section: 27-1/2" high with 4 - 10" deep drawers for storing clothes, blankets, pillows, etc.
|
A major problem with putting drawers in a house is houses are not built by cabinet makers!
Consequently they aren't square enough for drawers without shimming the sides.
Another issue is the walls may not be square with the front so both issues must be compensated.
I measured the walls compared to the front for square and found both were sloped out at the rear of the closet, which also meant the back was wider than the front.
I had to find a way to accurately measure the inside width at the front and rear of the closet so I came up with my ID Tool.
After finding the exact amout of out-of-square and width difference, I sawed shims from 2x4s to place between the sides of the closet and the drawer slides.
Of course I needed to know the narrowest place in the closet and built the drawes to this narrowest dimension.
The doors and drawer fronts are face frame surface mount with 1/2" birch plywood center and 1x2 pine frames.
The door handles and drawer pulls are made from 2x4s ripped to 1-1/2" then a 3/4" X 3/4" rabbet for the finger space (see pics).
The closet is enclosed at the front with 1/2" plywood.
The internal frame is 2x4 and the floors of the center and top sections are 1/2" plywood.
Here is a link to my page on making drawer handles (pulls).
Its been a couple of years and Betty wants me to add a horizontal shelf to the top section, we just didn't store stuff thats 26" high there, but we do store things about half that height.

|
This was a double wide closet with sliding doors, we could only use about 30% of the total area, now we can use almost all of the area.
|

|
The top area doors.
|

|
The top doors on the right side, open, showing the storage area.
Before adding the new shelf.
|

|
The left top side open showing blankets, quilts, and tall packages stored.
This is before adding the top shelf.
|

|
Top Right hand side with new shelf.
You can see the original diagonal supports for the front and the added horizontal shelf supports.
A vertical at the rear supports the back of the shelf horizontal.
These supports are 1-1/2" square stock ripped from 2x4s, the shelves are 1x8.
|

|
Top left shelf shown loaded.
We now have about 8" of space at the front of the top area for storing more stuff.
|

|
A little better shot showing the horizontal and rear vertical shelf supports.
|

|
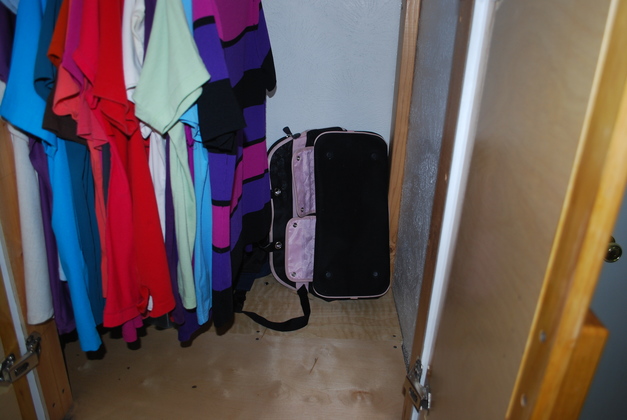
One side of the center (hanging clothes) section.
There is a storage area about 7" deep behind the clothes that makes both sides total over 9.3 cubic feet of storage.
Normally, the clothes bar is set at the back of a closet which wastes the front volume of the closet.
I set these at the front allowing storage for things like shoes, or boxes, etc. behind the hanging clothes.
|
|
Center with clothes pulled aside showing soft side luggage in rear storage area.
This area could also use a shelf.
|

|
Right side top and center open.
Note, Originally I only used two hinges per 41" high door, this proved later to be a bad idea, the flush mount hinges wore out.
I replaced the hinges on the tall doors and used 3 concealed hinges (with pockets) on each door.
|

|
I finally got around to building a mead aging rack for the back of this closet.
This one holds 42 Liters of mead.
Please take a look at other wine racks I have built.
|
New Hinges

|
Years later, heres a wine rack in the storage area in the back of the right side.
These are 1L bottles of Apple Mead (Cyser) aging.
This rack holds 7 rows of 6 1L bottles (42 Liters).
|

|
Also I replaced the original flush mounted hinges with concealed (pocket) hinges, and added a third hinge to the tall (41-1/2") doors.
|

|
Close up of new hinge with special shim I added, I was afraid the pocket would drill through on the front of the inside edge of the face frame.
|

|
Upper doors with new hinges.
|
Drawers

|
Drawers open.
|

|
The bottom drawer area.
Houses aren't built by cabinet makers.
I had to use tapered shims to make the slides parallel or the drawers wouldn't slide.
I built my Inside Dimension Tool to measure and adjust the inside widths before I installed the slides.
|
|
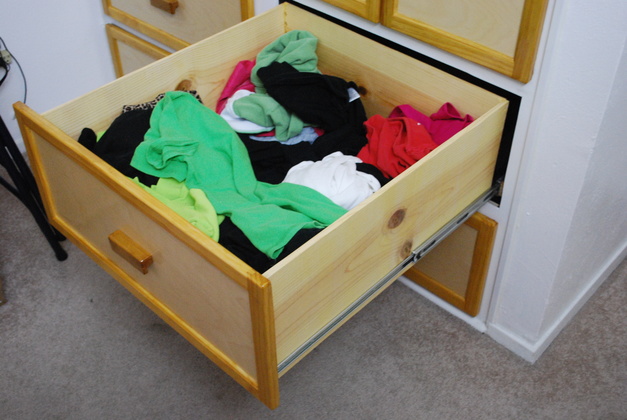
One of the four drawers open.
These drawers are 23-1/2" wide by 25" long and 10" deep.
As you can see, the drawer slides are full extension.
If you look at the knot in the near and far side are the same size and in the exact same place, I resawed the sides from the same board.
|

|
Showing face frame construction of door on the center section.
The doors and drawer fronts are made the same.
|

|
Inside of a door.
|

|
One pair of door handles.
These are just the top edge of a ripped 2x4, 1" high, 4" wide and with a 1/2" rabbet on the bottom and rounded corners.
Here is a link to my page on making door/drawer handles.
|
|
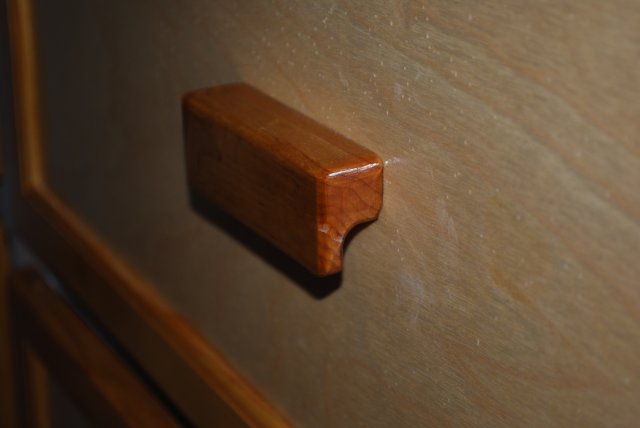
A drawer pull, same handle rotated.
In this shot, the handle is 4" wide, 1" high (from drawer front), 1-1/2" tall, with a 1/2" rabbet to create the bottom lip.
|