
|

|

|

|
|
DoveTail Jig and Sander Bench
| |||
|
|
|
|
|
|
DoveTail Jig and Sander Bench
| |||
| Build Info | Drawer Making | Diagram | Dovetail in Use |
| UPDATED Lift Handles |
Originally, I built this bench for my drum sander (Jet 16-32), but I didn't use the drum sander very often My 12" Delta disk sander (was on multibench) died, again and I wasn't able to get parts, so I got the Jet disk/belt sander (JSG-6DC), stored my drum sander, and put the Jet Disk on this bench. BTW The Jet JSG-6DC weighs just over 200lbs. Later, I got a Porter Cable DoveTail OmniJig and needed a place to store it, so I made the sliding shelf in the storage bay. I use the Omni-jig often since I really enjoy making drawers and like their storage capability.
I put drawer storage in almost everything I make.
In the last two weeks (12/02/18) I have made 26 drawers for a couple of projects, there are about 45 drawers in my shop, and over 60 in the house so you can tell, I like drawers which means I use the dovetail jig a lot.
Recently I've been thinking about when I get old and lifting that bulky Omni-Jig and placing it on my workbench may become a problem, so I decided to make it easier to use the dovetail jig.
The dovetail jig only weighs about 27Lbs. but it's very bulky.
I considered making a flip top bench with the Omni-Jig and belt-disk sander (they're both wider than other tools) but because the belt-disk sander is 31-1/2" high it wouldn't work.
I think I can use one of the Rev-a-Shelf heavy-duty appliance lifts (like for a stand mixer) to lift the Omni-Jig into a working position.
The Rev-a-shelf can lift up to 60Lbs, the Omni-Jig is well within its capacity.
After looking over the Rev-a-shelf spec. I ordered the heavy-duty version.
When it gets here I'll be able to set the bench specs.
The Rev-a-Shelf instructions are specific for a Kitchen-aid stand mixer, the Omni-Jig is not as tall or deep, has a 2-1/2" projection below it's base, and is much wider (34") than a stand mixer.
The Rev-a-Shelf's lifting capacity is adjustable (0 to 60Lbs) and the Omni-Jig weighs only 27Lbs.
So I'll need to customize dimensions.
My inital look at the Rev-a-shelf lift make me think I don't need a deeper cabinet (18" should be OK), but I will need a wider cabinet.
The Omni-Jig is 34" wide and I'll need about 3-1/2 " more inside width, so the cabinet will be about 39" wide (cabinet side verticals are 1-1/2 X 2 or 3") unless I can get the side mechanism to operate in the space behind the end knobs on the Omni-Jig.
A Rev-A-Shelf this wide needs a handle on each end that can be held while unlatching. You should be able to slightly lift the shelf, pull the latch, then hold the handles while you lower, and use the handles to lift the shelf. Remember, the dovetail jig has a center lip hanging down between the latch handles. The lift handles need to be attached under each end of the shelf and protrude beyond the latch, which pulls out 1". A piece of 3/4" plywood would make a good support extension, and even a 3/4" dowel, horizontal, beyond the travel of the latch, could be the lift handle.


|
Rev-a-Shelf on test board, front to left. I measured the thickness of the upper side mounts, the lowest swing point, and the farthest back the mechanism went before I designed the cabinet. |

|
2x8s cut to length, next I rip and resaw (if necessary). Heres more info on my lumber preparation. |

|
Corner verticals, and bottom stringers ripped. |

|
Top being edge joined (glued). I ripped the 3 pieces for the top a little wider than 6" each, then ran them througn the joiner. |

|
One of the side frames being glued. Note the ClampIts in the corners keeping everything square. |

|
Closer look at bottom of a side frame being glued, note the notch for the bottom stringer. Also good look at a ClampIt in action. |

|
The HFrame being glued. This thing will be the bottom of the dovetail storage area and above the shelf. The inset panel in it will keep out dust and dirt. |

|
Side frame after rabbeting for inset panel and cutting slots for the biscuits aligning the HFrame. |

|
A little better look at the HFrame biscit slot and the panel rabbet. |

|
Side panel on top of bench top. You can see the biscuit slots aligning. |

|
HFrame on top of side frame showing biscuit slots aligned. Note the top edge of the HFrame is rounded. |

|
Back edge of HFrame on top of side frame, note the 1/2" gap for the back panel. |

|
Inside of side frame showing rounded edges that will be in front of inset panel. |

|
Another look at lower end of side panel, showing HFrame biscuit slot, inset panel rabbet, and notch for bottom horizontal. |

|
Back side of side panel with inset panel glued in. |

|
As usual I'm assembling it upside down, bench top with right side panel being glued. The side frame looks bent but it's only the clamps under pressure. |

|
A little better prespective on the side frame glue on.
You can see both ClampIts keeping the joint square.
|

|
HFrame right side being glued. Note the stiff leg, on left, I made to hold it level. The top's end is off the workbench so I can clamp down on the left side when its glued to the top. |

|
Close look at the stiff leg. |

|
In this pic, you can see the left side, laying on the side table, ready to glue. |

|
Right side and HFrame glued. |

|
Left Side and HFrame glued. |

|
Bottom stringers screwed and glued. |

|
Back glued in, and Left Rev-a-Shelf installed. Remember, the bench is upside down. |

|
Upside down pic of left side Rev-a-Shelf installed. One inch from front, note the back of the lower frame just touches the cabinet back. |

|
Upside down pic of right Rev-a-Shelf installed. You can see how the back of the lowered frame touches the cabinet back. I'm going to have to bend the unlock handles toward each other to shorten them. I might screw them both to a wooden bar for one hand unlock if it won't interfear with the Omni-Jig's workings. |

|
Rev-a-Shelf at lowest point, about 3/8" from bottom of compartment. |

|
Rev-a-Shelf in extended position. The back of the shelf bracket is 6-1/2" from front of upper bracket. I have 5-1/2" of clearance from front of bench top, I mounted the top Rev-a-Shelf bracket 1" from bech top front. |

|
Bench on it's wheels, sanded, ready to paint. Note: the drawer separator is installed. Also note, Bullet and Brass cabinet no longer in mortiser bench, makes the bench easy as pie to move when I open the big door. |

|
Close look at Rev-a-Shelf install, in down position. |

|
Back side. |
|
|
With Rev-a-Shelf raised. Note the Rev-a-Shelf shelf frame is just above the bench top and 5-1/2" from it's edge. |

|
After first coat of paint (clear water based poly). |

|
Shelf attached. This is the same shelf from the sliding shelf in the old bench. |

|
With Rev-a-Shelf lowered.
|

|
About to transfer sander from the old bench to the new, old sander bench on left. Remember, this sander weighs a little over 200lbs. |

|
Sander on the new bench, Omni-jig installed. Omni-Jig in lowered position, note the dust shroud doesn't need to be removed to lower it. I moved the sander to the end, allowing some room on the left end for another tool. |

|
Omni-Jig in raised postion, ready to slide over to the woodworking bench, on the right. Yes the Omni-Jig will fall over if there isn't something on the bench to couter balance it. |
|
|
A different perspective. |
|
|
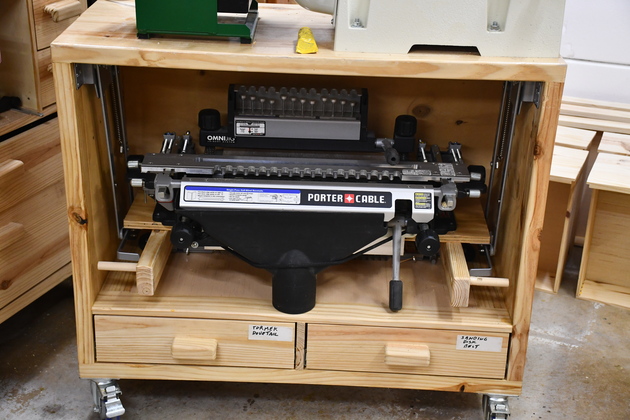
Closer look at Omni-Jig stored. I'm going to use the Omni-Jig now to make the drawers that go under it. |

|
Added the Tormek sharpener. Now all the bench needs is drawers. |

|
Drawers, glued waiting on paint. |
|
|
Sander bench complete with drawers installed. Please see the Dovetail In Use Page. |
Because of the width and weight of the shelf and jig, it was very awkward to lift or lower it.
This was an oversight on my part, the original design didn't allow for the awkwardness, so I came up with these lift handles which allow you to release the latch then lower the shelf/jig to it's down position.
The lift handles carry the weight in your hands at the same time allowing you to pull the latch handles with your fingers to release the latch.
The exact distances from the front edge of the shelf and the handle depends on where the shelf edge in relation to the upper lift mechanism.
The key point is make sure the dowels are at least 1" forward of the latch handles when latched.
The exetensions are 2x3s, 11" long, I put 2 1-5/8" wallboard screws down through the shelf into the lift extensions.


|
Dovetail raised with new lift handles (RED CIRCLES). |

|
Closer look at the lift handle. Because of the distance to conveniently pull the latch, when you lift of lower the jig storage shelf, you have to place your hands under the 3/4" dowels with palm upward, then unlatch and lower or lift an let it latch automatically. |

|
Closer front view of raised dovetail and new lift handles. |

|
The lift handle position must allow the latch handle to move 1" forward in order to unlatch. When you raise the dovetail jig with the lift handles you don't need to toudh the latch handle, they latch automatically when the shelf is high enough. As you raise the jig, and you come to the raised position the latch handles will move out toward the lift handles then jump back when they latch, don't get your fingers caught. |

|
Dovetail jig lowered into it's storage position. Again, note the lift handles (RED CIRCLES). |

|
Closer look at dovetail jig in lowered position, note the lift handles are flush with the outside of the cabinet when the jig is in the lowered postion. |

|
Left lift handle in lowered position. |

|
Preparing to move the dovetail jig to the workbench. |

|
Front view of raised jig storage. |

|
Quarter view of raised jig. In order to lower the jig, you must first raise it slightly to remove the pressure from the latch mechanism, then pull the latch handles to release the latch, and lower the jig. As you lower the jig, you can release the latch handles after you have lowered the jig about 3 - 4 ". |
|
|
Jig in lowered position. |
|
|

|
|

|
Side view of raised jig. |

|
Another side view of raised jig. |

|
|