
| 
| 
| 
|
| Machine Caster Bases | |||
|
|
|
|
|
| Machine Caster Bases | |||
| Other tools on caster bases | Drill Press Storage Base | Table Saw Caster Base | Planer Caster Base |
| General Info | Caster Base Build |
The caster base raises a machine about 6", but, since I like the work close to my eyes, the increased height is good, for me anyhow.
I make the caster bases larger than the machine base, about an inch all the way around, or 2" in each dimension.
Then putting the casters right in the corner, the machine is very stable when pushed or pulled around.
I build a flat base with blocks attached to the top, spaced so they just fit up inside the original machine's base.
This keeps the machine from wanting to scoot off the base when you push or pull it, remember gravity is your friend in this case.
These pics cover replacing the Jet JPM-13CS (13" planer) base with a larger base.
This was the first caster base I built, but I missed the dimensions, and got it a little too small, the machine wanted to tip when a wheel encountered even a large wood chip.
Originally, this thing came with wheels, but didn't swivel, and I needed it more flexible so I removed the factory wheels.
Recently, I decided to replace the JPM-13CS base with a little larger base.
It also gave me a chance to take pics while building this simple project.
BTW, I used 3" double locking casters on all these, from Woodcraft. I have had several of these caster's wheel break apart and had to replace them. I think I'll be using another caster from now on.

|
Here are the pieces (2x4s) for a new caster base cut to length and marked. Note I square cut the pieces. The marks allow me to easily line up the saw when cutting the miters so the sides are the correct length after I the cut. |

|
Here I'm lining up the miter saw with the mark so the side will be the same length after the cut. |

|
I cut one end of each piece with the miter saw in one 45° position, then move the saw to the other 45° position, and cut the other end of each piece. That way the two 45° cuts are as good as the miter saw's index (the Bosch's index is good) and nulls out the relation to the fence to the index. |

|
I mark the positions of the two biscuits in each corner. |

|
Cutting the biscuit slot in each end. |

|
I put blocks in the tee tracks on my workbench so I can just lay the pieces against them and cut the biscuit slot. |

|
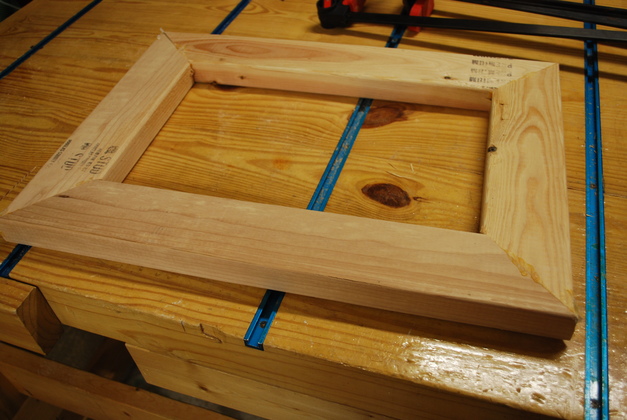
Heres what the mitered corner looks like after it's glued. |
|
The base with it's miters glued. |

|
I measure under the machine's base to see how big the hole is then attach blocks on the caster base so the fit the machine base, so the machine will not move in relation to the base, only the base rolls. Next I sand and paint the whole thing to seal it. |

|
A complete base ready to set the machine on it. Note I use the WoodCraft 3" (rated at 300#) double locking 3" casters. |
|
|
How to move from one base to another, by yourself?
Here it is shown on the new base, but it gives you an idea of where the cradle had to touch. I also removed the roller extension from this side before tilting. |

|
Here is the cradle, it had to contact the planer near the base and on the movable bed, and still miss the plastic switch housing. The planer's base had to be high enough to be above the new Caster Base, or 6". I kept the bottom stringers longer than necessary so I could stand on them so the cradle wouldn't move while tilting the planer. |

|
Here is the planer laying on the cradle, I did it by myself and I'm not a big guy. Note the casters are locked, you can also see the blocks on the top of the base to keep the planer's cabinet in postion. |

|
The bottom (base) end. You can just barely see the new base at the upper right corner of the pic, leaning against a tool cabinet. |

|
You notice the old base is almost exactly the same size of the machine's base. Note the two triangular tabs extending in from the front and back side, I had forgotten that when placing the front/back blocks on the new base, so I removed them and re-used these on the new base. Of course I locked the casters on the old and new bases when tilting, the whole thing was easy as pie. I actually used clear packaging tape to temporarily attach the new base to the bottom of the planer, while in this position, that way I didn't have to juggle a 230# machine to align the bases. |

|
The Jet JJ-6CSDX long bed jointer on it's caster base (weight 230#). |

|
The Jet JBS-14DXPRO on it's caster base (weight 265#). I didn't lean this over, I raised it straight up, a bit at a time keeping it vertical, then rolled the base under it. I supported it on two angle irons raised on blocks so the base could roll under it. |

|
Because of the way Jet cantilevered the motor on the back side they added these outrigger tabs so I made the base to fit with the usual overlap. Its very stable and rolls well, note all these heavy machines use the WoodCraft 3" (rated at 300#) double lock swivel casters. This caster base is 26" X 19". |
|
|
3 Tools with caster bases. If I had used commercially available (low boy) bases I couldn't get them this close together. |