BH1750 Luminosity Sensor
#include <BH1750.h>
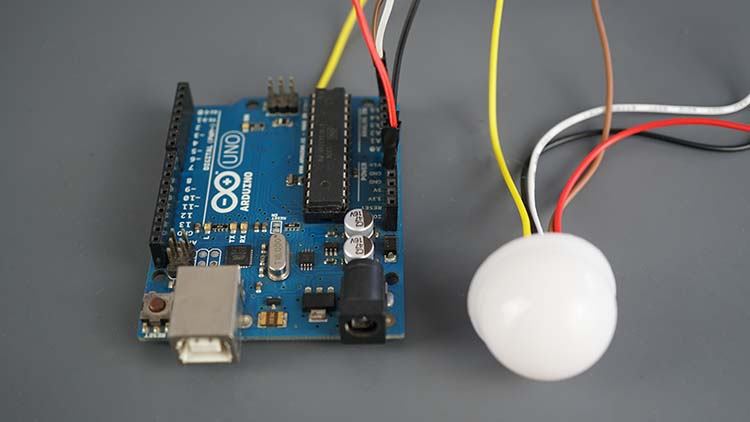
Arduino with BH1750 Ambient Light Sensor
The BH1750 is a 16-bit ambient light sensor. In this guide, you’ll learn how to
use the BH1750 ambient light sensor with the Arduino board. The sensor
communicates with a microcontroller using I2C communication protocol.
 Arduino Board with BH1750 Ambient Light Sensor Arduino IDE
You’ll learn how to wire the sensor to the Arduino board, install the required
libraries and use a simple sketch to display the sensor readings in the Serial
Monitor.
This tutorial covers the following topics:
Arduino Board with BH1750 Ambient Light Sensor Arduino IDE
You’ll learn how to wire the sensor to the Arduino board, install the required
libraries and use a simple sketch to display the sensor readings in the Serial
Monitor.
This tutorial covers the following topics:
Introducing the BH1750 Ambient Light Sensor
Introducing BH1750 Ambient Light Sensor
The BH1750 is a 16-bit ambient light sensor that communicates via I2C protocol.
It outputs luminosity measurements in lux (SI-derived unit of illuminance).
It can measure a minimum of 1 lux and a maximum of 65535 lux.
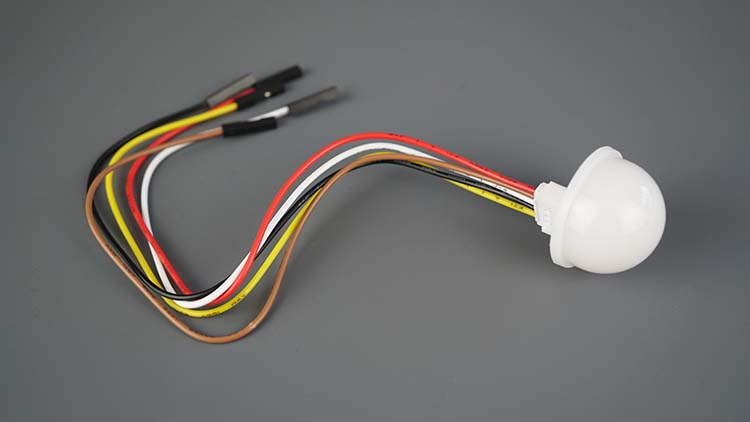
The sensor may come in different breakout board formats. See pictures below.
Both images represent a BH1750 sensor.
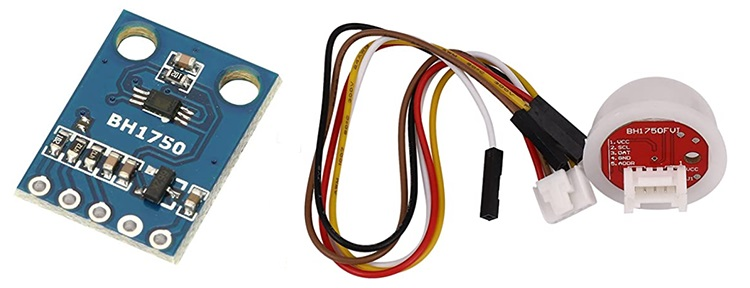
BH1750 Ambient Light Sensor Breakout Boards
BH1750 Features
Here’s a list of the BH1750 sensor features. For more information consult the
BH1750 sensor datasheet
I2C bus Interface
Spectral responsibility is approximately human eye response
Illuminance to digital converter
Range: 1 – 65535 lux
Low current by power down function
50Hz / 60Hz Light noise reject-function
It is possible to select 2 different I2 C slave-addresses
Small measurement variation (+/- 20%)
The influence of infrared is very small
Supports continuous measurement mode
Supports one-time measurement mode
Measurement Modes
The sensor supports two different measurement modes: continuous measurement
mode, and one-time measurement mode. Each mode supports three different
resolution modes.
|
|
| Low Resolution Mode | 4 lux precision 16 ms measurement time
|
| High Resolution Mode | 1 lux precision 120 ms measurement time
|
| High Resolution Mode 2 | 0.5 lux precision 120 ms measurement time
|
In continuous measurement mode, the sensor continuously measures ambient light
values. In one-time measurement mode, the sensor measures the ambient light
value once, and then it goes to power down mode.
Applications:
 BH1750 Ambient Light Sensor
The BH1750 is an ambient light sensor so it can be used in a wide variety of projects. For example:
BH1750 Ambient Light Sensor
The BH1750 is an ambient light sensor so it can be used in a wide variety of projects. For example:
| to detect if it is day or night;
|
| to adjust or turn on/off LED’s brightness accordingly to ambient light;
|
| to adjust LCDs and screen’s brightness;
|
| to detect if an LED is lit;
|
| …
|
BH1750 Pinout
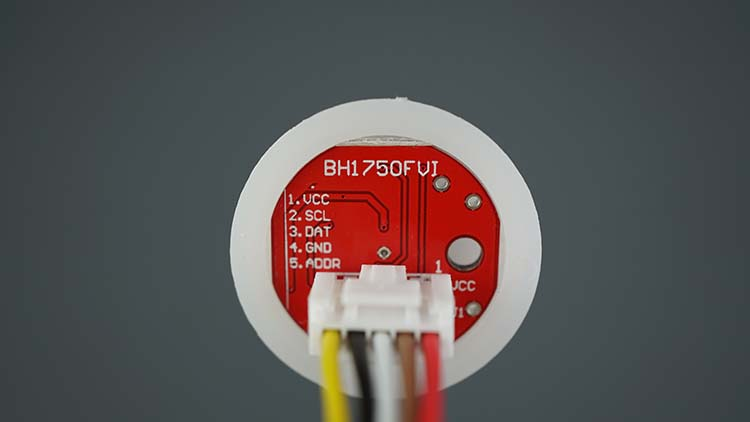 BH1750 Ambient Light Sensor Pinout
Here’s the BH1750 Pinout:
BH1750 Ambient Light Sensor Pinout
Here’s the BH1750 Pinout:
|
|
| VCC | Powers the sensor (3.3V or 5V)
|
| GND | Common GND
|
| SCL | SCL pin for I2C communication
|
| SDA (Data) | SDA pin for I2C communication
|
| ADD* | Selects address
|
The ADD pin is used to set the I2C sensor address. If the voltage on that pin
is less than 0.7VCC (pin is left floating or connected to GND), the I2C address
is 0x23. But, if the voltage is higher than 0.7xVCC (pin is connected to VCC),
the address is 0x5C. In summary:
ADD pin floating or connected to GND → address: 0x23
ADD pin connected to VCC → address: 0x5C
BH1750 I2C Interface
The BH1750 ambient light sensor supports I2C interface.
Arduino with BH1750 Ambient Light Sensor
 You can connect the BH1750 sensor to the Arduino using the default’s I2C pins
(these are the pins for the Arduino UNO, if you’re using another model, check
its I2C pins):
You can connect the BH1750 sensor to the Arduino using the default’s I2C pins
(these are the pins for the Arduino UNO, if you’re using another model, check
its I2C pins):
|
|
| BH1750 | Arduino
|
| SCL | A5
|
| SDA | A4
|
BH1750: Read Ambient Light with Arduino
Now that you are more familiar with the BH1750 sensor, let’s test it. In this
section, we’ll build a simple project that reads the ambient light and displays
it in the Arduino IDE Serial Monitor.
Parts Required
To complete this tutorial you need the following parts:
You can use the preceding links or go directly to MakerAdvisor.com/tools to
find all the parts for your projects at the best price!
Schematic – Arduino with BH1750
Wire the BH1750 sensor to the Arduino I2C pins. You can follow the next
schematic diagram.
Arduino BH1750 Wiring Diagram
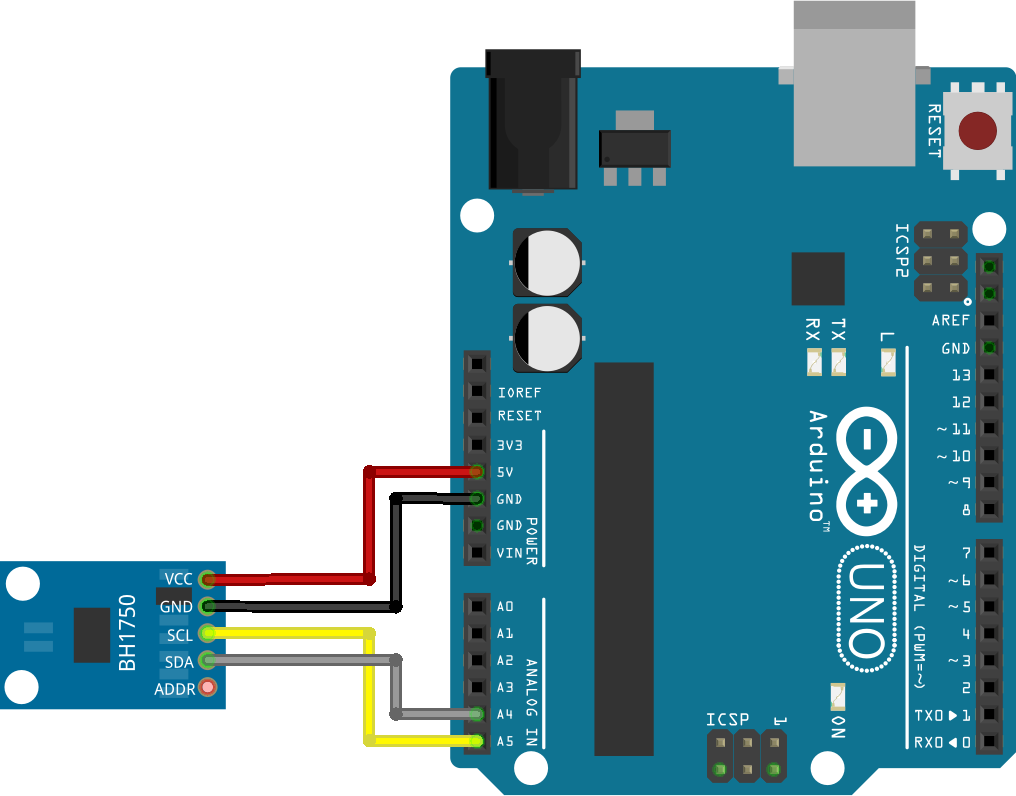 You can also follow the next table:
| |
|
| BH1750 | Arduino
|
| VCC | 5V
|
| GND | GND
|
| SCL | A5
|
| SDA (Data) | A4
|
| ADD* | Don’t connect
|
By not connecting the ADD pin, we’re selecting 0x23 I2C address. Connect it to
3.3V to select 0x5C address instead.
Installing the BH1750 Library
There are several libraries to read from the BH1750 sensor. We’ll use the
BH1750 library by Christopher Laws. It is compatible with the ESP32, ESP8266,
and Arduino.
Open your Arduino IDE and go to Sketch > Include Library > Manage Libraries.
The Library Manager should open.
Search for “BH1750” on the search box and install the BH1750 library by
Christopher Laws.
 BHT1750 Library Arduino IDE
Code – Reading BH1750 Ambient Light Sensor
Copy the following code to your Arduino IDE. This code simply reads ambient
light in lux and displays the values on the Serial Monitor. It is the example
code from the library called BH1750test (you can access it in
File > Examples > BH1750 > BH1750test
/*H*******************************************************
Example of BH1750 library usage. This example initialises the BH1750 object
using the default high resolution continuous mode and then makes a light level
reading every second.
********************************************************/
#include <Wire.h>
#include <BH1750.h>
//************************* DEFINES ************************************
#define BAUD 9600
//************************* PROTOTYPES ************************************
//************************* VARIABLES ************************************
BH1750 lightMeter;
/*F********************************************************************
*
**********************************************************************/
void
setup()
{
Serial.begin( BAUD );
// Initialize I2C bus (BH1750 library doesn't do this automatically)
Wire.begin();
// On esp8266 you can select SCL and SDA pins using Wire.begin( D4, D3);
// For Wemos / Lolin D1 Mini Pro and Ambient Light shield use
// Wire.begin( D2, D1);
lightMeter.begin();
Serial.println( F( "BH1750 Test begin"));
}
/*F********************************************************************
*
**********************************************************************/
void
loop()
{
float lux = lightMeter.readLightLevel();
Serial.print( "Light: " );
Serial.print( lux );
Serial.println( " lx" );
delay( 1000 );
}
The library also provides other examples worth exploring.
How the Code Works
We start by including the required libraries. The Wire.h library to use I2C
communication protocol and the BH1750.h library to read from the sensor.
/*H********************************************************************
*
**********************************************************************/
#include <Wire.h>
#include <BH1750.h>
Then, we create a BH1750 object called lightMeter.
BH1750 lightMeter;
In the setup(), initialize the Serial Monitor at a baud rate of 9600.
Serial.begin(9600);
Initialize I2C communication protocol. It will start an I2C communication on the
microcontroller’s default I2C pins. If you want to use different I2C pins, pass
them to the begin() method like this Wire.begin(SDA, SCL).
Wire.begin();
Initialize the sensor using the begin() method on the BH1750 object (lightMeter).
lightMeter.begin();
In the loop(), we create a variable called lux, that saves the luminance values.
To get the value, you simply call the readLightLevel() function on the BH1750
object (lightMeter).
float lux = lightMeter.readLightLevel();
Finally, display the measurement on the Serial Monitor.
Serial.print("Light: ");
Serial.print(lux);
Serial.println(" lx");
You get and print a new reading every second.
delay( 1000 );
Demonstration
Now, you can upload the code to your board. First, connect your board to your
computer. Then, go to Tools > Board and select the Arduino board you’re using.
Go to Tools > Port and select the COM port your board is connected to. Finally,
click on the upload button.
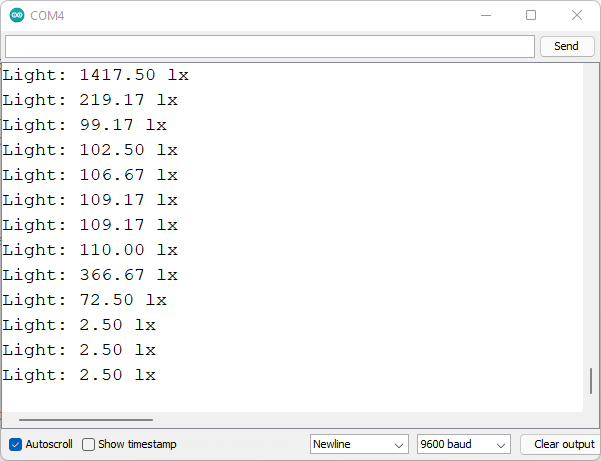
After successfully uploading the code, open the Serial Monitor at a baud rate
of 9600.
New luminance readings should be printed in the Serial Monitor.
 Arduino Board with BH1750 Ambient Light Sensor Arduino IDE Demonstration
Other Useful Functions
The library we’re using with the BH1750 sensor provides other examples that
illustrate other useful functions and features. You can check all BH1750 library
examples here.
Setting Measurement Mode
By default, the library uses the continuous high resolution measurement mode,
but you can change it by passing the desired measurement mode to the begin()
method when initializing the sensor. For example:
lightMeter.begin(BH1750::CONTINUOUS_HIGH_RES_MODE)
Here’s a list of all available modes:
BH1750_CONTINUOUS_LOW_RES_MODE
BH1750_CONTINUOUS_HIGH_RES_MODE (default)
BH1750_CONTINUOUS_HIGH_RES_MODE_2
BH1750_ONE_TIME_LOW_RES_MODE
BH1750_ONE_TIME_HIGH_RES_MODE
BH1750_ONE_TIME_HIGH_RES_MODE_2
See the properties of each mode in this previous section.
Wrapping Up
In this tutorial, you’ve learned how to use the BH1750 ambient light sensor with
the Arduino Uno. The sensor is very easy to use. It uses I2C communication
protocol, which makes wiring simple, and the library provides methods to easily
get the readings.
We hope you found this tutorial useful. Tell us in the comments below in which
project would you use the BH1750 sensor.
We have tutorials for other sensors with the Arduino board that you may like: