WiFi Manager
#include <WiFiManager.h>
From: https://dronebotworkshop.com/wifimanager/
ESP32 WiFiManager – Easy WiFi Provisioning
Today we will see how to use WiFiManager to provide an SSID, password, and other
configuration information to an ESP32. Stop hard-coding your WiFi information!
Introduction
The ESP32 is an amazing microcontroller. It’s inexpensive yet powerful, boasting
a 32-bit processor and many models have dual-cores. It has a wealth of I/O
ports, several 12-bit A/D converters, a digital to analog converter, and I2C,
I2S, SPI, and UART communications.
 It even has touch switch capabilities, and many models have built-in cameras,
displays, and/or microphones.
But despite all of those capabilities, the feature that most experimenters
cherish in the ESP32 is its built-in WiFi and Bluetooth capabilities. This
opens up a whole world of remote control and internet-enabled applications.
It even has touch switch capabilities, and many models have built-in cameras,
displays, and/or microphones.
But despite all of those capabilities, the feature that most experimenters
cherish in the ESP32 is its built-in WiFi and Bluetooth capabilities. This
opens up a whole world of remote control and internet-enabled applications.
 Working with WiFi on the ESP32 is effortless, thanks to the included WiFi
Library. But there is a weak point in the system, and that is getting connected
to the WiFi network in the first place.
Working with WiFi on the ESP32 is effortless, thanks to the included WiFi
Library. But there is a weak point in the system, and that is getting connected
to the WiFi network in the first place.
Connecting to WiFi
The normal method of connecting to a WiFi network in an ESP32 sketch is to code
your network login parameters ( SSID and password ) directly in plain text. While
this is certainly sufficient when you are just experimenting, it has a number
of disadvantages:
Your ESP32 can ONLY connect to the network you’ve hard-coded.
Changing WiFi networks requires a code edit and recompilation.
You need to edit that data out of your code if you share or distribute it.
You can’t create a commercial product using hard-coded WiFi parameters.
A preferable method would be to use a system that lets you configure your WiFi
credentials after the code has been compiled and loaded onto your ESP32. This
type of system is known as “WiFi Provisioning”.
WiFi Provisioning
What exactly is “WiFi Provisioning”?
Provisioning is the process of preparing and equipping a network to allow it to
provide new services. When we are dealing with WiFi it involves providing some
credentials to connect to a network and obtain an IP address.
Connecting to a WiFi network requires two pieces of information:
The Network SSID – SSID stands for Service Set Identifier and is your
network’s name.
The Network Password – Used for a secured WiFi network, which most are ( and
I hope yours is ).
One method of provisioning a WiFi network is to use a keypad and display to
enter these credentials. If your project already has these pieces of hardware,
then this is a feasible option.
But many of our ESP32 projects, in fact, most of them, don’t have a keyboard or
display. And it wouldn’t really be cost-effective to add them just to connect to
the WiFi network.
What we need is a method of doing this without any additional hardware. And we
can look at the world of commercial devices to get some great examples.
IoT Devices and Computer Peripherals
Commercial IoT devices come in all shapes and sizes, from cameras and displays
to temperature sensors and light bulbs. And they all require a connection to a
WiFi network to function.
Obviously, putting a control panel on each of these devices to allow WiFi setup
would be impossible, imagine how you’d accomplish this with a light bulb!
Then we have computer peripherals, specifically printers, and scanners. While
many of these devices do have displays, they usually have a limited, if any,
input device. It wouldn’t be that easy to enter your WiFi credentials on a
device with only four buttons on its keypad, especially if you use a secure
password with a mix of numeric, alphabetical, and punctuation characters.
These devices employ a few different methods to achieve WiFi connectivity.
Provisioning Methods
There are several ways we can accomplish WiFi Provisioning. We are going to look
at three of them today:
- SmartConfig – A method developed by Texas Instruments. It requires an app on
an Android or IOS device to configure the WiFi credentials.
- WPS – WiFi Protected Setup, which uses a pushbutton on both the router and
target device to achieve pairing and connectivity. Not every router supports
WPS.
- Local Access Point – This sets up the target device initially as a web
server at a fixed address. The server displays a configuration page and an
external device ( computer, tablet, phone ) is used to configure it and then
set it into WiFi slave mode.
Each of these methods has strengths and weaknesses, and note every one of them
is suitable for every application.
The method we will be using today is the Local Access Point method.
This chart compares the features and requirements of the three provisioning
methods:
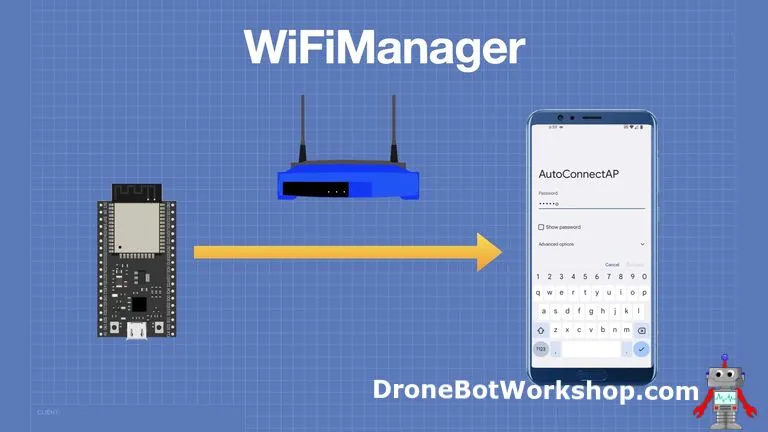
WiFiManager
Local Access Point ( or Local AP for short ) is an ideal method to use with the
ESP32. It allows you to use a phone, tablet, or WiFi-capable computer to set up
your ESP32 WiFi credentials, as well as any additional configuration parameters
you might require.
WiFiManager is a library that was originally written to perform this task using
an ESP8266, and it has now been expanded to work with the ESP32.
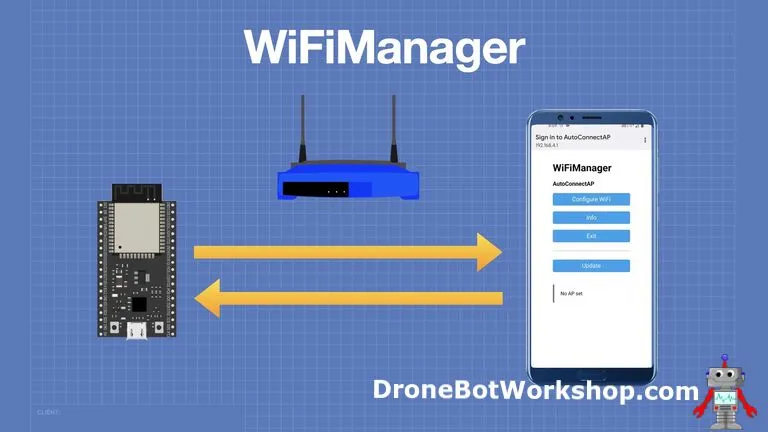
WiFiManager works as follows:
- 1 – The ESP32 Boots up and checks to see if it already has a WiFi network
configured.
- 2 – If it does have WiFi credentials, it uses them to log into a network.
Assuming it is successful, then no other action is required, and it can start
running its sketch.
- 3 – If it does not have WiFi credentials, or if they are invalid, it sets
itself up as an Access Point instead. An Access Point is where the ESP32
provides its own WiFi network for other devices to connect to.
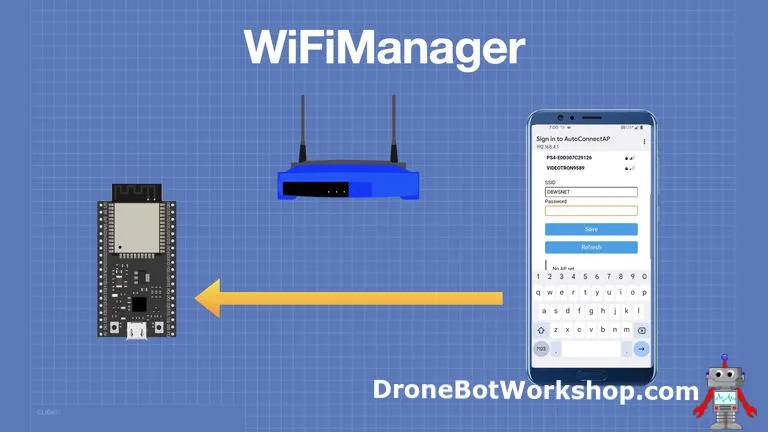
- 4 – It creates a webpage at an address of 192.168.4.1. On the webpage, there
is a list of available WiFi networks that you can join, plus text boxes for
entering your SSID and password. You can also configure it to have additional
text boxes ( or other HTML elements ) to grab other configuration information you
might require.
- 5 – The user enters the appropriate information and presses the Save button.
The information is transmitted back to the ESP32.
- 6 – The ESP32 changes back to Station mode and attempts to connect to the
desired WiFi network using the supplied credentials.
- 7 – Assuming that the user has supplied the correct login credentials, the
ESP32 will now be connected to the WiFi network.
This is not a system unique to WiFiManager, and there are several code samples
that would allow you to implement this. The beauty of WiFiManager is that it is
all done for you in the library. You don’t need to code any HTML ( unless you
want to ) to make it work. It’s really just a few lines of code.
Basic WiFiManager Tests
The best way to learn about something, of course, is to put it to use. So let’s
get WiFiManager installed and start using it!
We will be using the Arduino IDE. I used the classic ( version 1.8.xx ) IDE, but
you can also use the newer Arduino IDE 2.0.
I am going to assume that you have already set up your Arduino IDE to use the
ESP32, so I won’t go over that step in this article. If you haven’t done that,
then please refer to my article on getting started with the ESP32 for details.
WiFiManager Installation
If you want to install the WiFiManager from the GitHub repository, you can do
that, but the easiest way to get it installed is to just use the Arduino IDE
Library Manager.
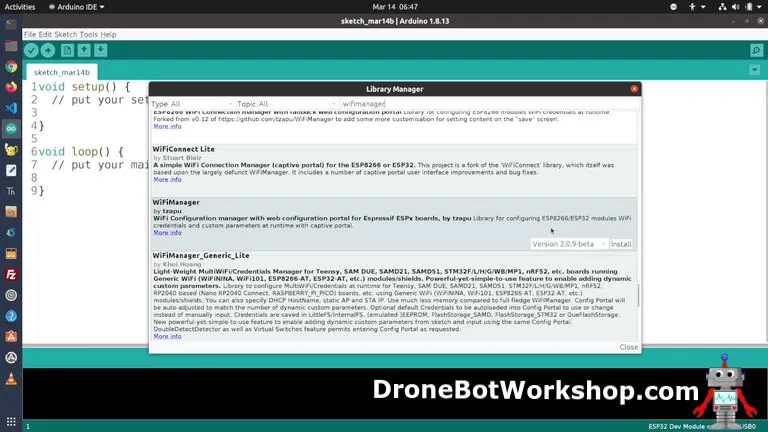
Open your Library Manager and search for “WiFiManager” ( all one word ). You will
get a bunch of results, scroll down to the “W” section and look for “WiFiManager by tzapu”. Click the “Install” button to add the library to your Arduino IDE.
 To confirm that the installation was successful, open your Examples menu and
scroll down to the section for “Examples from Custom Libraries”. Down near the
bottom, you should see a “WiFiManager” selection. Highlight it, and you should
see several example folders and files.
To confirm that the installation was successful, open your Examples menu and
scroll down to the section for “Examples from Custom Libraries”. Down near the
bottom, you should see a “WiFiManager” selection. Highlight it, and you should
see several example folders and files.
WiFiManager Demo
We will be testing out the installation using one of the example files installed
when you added the WiFiManager library to your Arduino IDE.
Highlight the WiFiMaager item in the “Examples from Custom Libraries” section
and look for the Basic example. Load that into your IDE.
Basic WiFiManager Example
/*F********************************************************************
*
**********************************************************************/
#include <WiFiManager.h> // https://github.com/tzapu/WiFiManager
/*F********************************************************************
*
**********************************************************************/
void
setup()
{
WiFi.mode( WIFI_STA ); // EXPLICITLY SET MODE, ESP DEFAULTS TO STA+AP
// IT IS GOOD PRACTICE TO MAKE SURE CODE SETS WIFI MODE HOW YOU WANT IT.
// PUT YOUR SETUP CODE HERE, TO RUN ONCE
Serial.begin( 115200 );
// WiFiManager, LOCAL INTIALIZATION. ONCE ITS BUSINESS IS DONE, THERE IS
// NO NEED TO KEEP IT AROUND
WiFiManager mgr;
// RESET SETTINGS - WIPE STORED CREDENTIALS FOR TESTING
// THESE ARE STORED BY ESP LIBRARY
// mgr.resetSettings();
// AUTOMATICALLY CONNECT USING SAVED CREDENTIALS,
// IF CONNECTION FAILS, IT STARTS AN ACCESS POINT WITH THE SPECIFIED
// NAME ( "AutoConnectAP" ),
// IF EMPTY WILL AUTO GENERATE SSID, IF PASSWORD IS BLANK IT WILL
// BE ANONYMOUS AP ( mgr.autoConnect() )
// THEN GOES INTO A BLOCKING LOOP AWAITING CONFIGURATION AND WILL
// RETURN SUCCESS RESULT
bool rslt;
// rslt = mgr.autoConnect(); // AUTO GENERATED AP NAME FROM CHIPID
// rslt = mgr.autoConnect( "AutoConnectAP" ); // ANONYMOUS AP
// PASSWORD PROTECTED AP
rslt = mgr.autoConnect( "AutoConnectAP","password" );
if( !rslt )
{
Serial.println( "Failed to connect" );
// ESP.rslttart();
}
else
Serial.println( "connected...yeey : )" ); // WiFi CONNECTED
}
/*F********************************************************************
*
**********************************************************************/
void
loop()
{
// put your main code here, to run repeatedly:
}
Let’s take a look at the example, as it does a good job of illustrating how the
WiFiManager library is used.
We begin by including the WiFiManager library.
The bulk of the sketch is inside the Setup function. We start setup by including
the WiFi library, which is required to make WiFiManager work.
Next, we set up our serial monitor, which will be used to monitor the connection
progress.
We build an object to represent our WiFiManager, in this sketch it is called
“wm”, but you can use anything that makes sense to you.
There is a command a bit further down, on line 15, that calls a resetSetttings()
method. By default, it is remarked out. If you run it, resetSettings() will wipe
the current network configuration every time the ESP32 is booted up. You don’t
want to do this in production mode, but for testing, this is often useful.
We then define a boolean, called “res”, to report the result of our WiFiManager
connection attempt.
Below that, you can see the syntax for launching WiFiManager:
Autoconnect.( SP Name, Password )
The only required parameter is Autoconnect. The SP name is the name you want to
give the local WiFi Access Point that is launched on the ESP32 when WiFiManager
is started. If you leave out the password, then the local Access Point network
won’t require one.
After that, we look at the results and print them to the serial monitor.
As everything is run in Setup there is no code in the Loop.
Load the demo onto your ESP32 board and open up a WiFi-enabled device such as a
phone, tablet, or computer. Look for the “AutoConnectAP” network, and connect to
it using a password of “password”.
Make sure you are running your serial monitor, and observe the debug information
presented there.
After connecting, open a web browser and go to 192.168.4.1. On many phones and
tablets, you will be automatically directed there.
 You will see the WiFiManager opening screen. There are four sections on this
screen:
You will see the WiFiManager opening screen. There are four sections on this
screen:
- Configure WiFi – This is the button that you will want to select to connect your ESP32 to a WiFi network.
- Info – Some information about the ESP32 board.
- Exit – Exit the page.
- Update – OTA update of the ESP32 code.
Select Configure WiFi. There will be a short delay while the available WiFi
networks are scanned. You can watch the progress on the serial monitor.
You will then be presented with a list of WiFi networks. It’s a nice display,
with signal strengths and protection status illustrated beside the network name.
 Select the network you want to connect to, and its name will automatically
populate the SSID text box. Use the other box to enter the network password,
then press the Save button.
Watch the serial monitor. Assuming you entered the correct password, you should
see the connection results.
Select the network you want to connect to, and its name will automatically
populate the SSID text box. Use the other box to enter the network password,
then press the Save button.
Watch the serial monitor. Assuming you entered the correct password, you should
see the connection results.
 The ESP32 will now drop its local AP network and connect to the WiFi network.
All without hard-coding any network credentials!
The ESP32 will now drop its local AP network and connect to the WiFi network.
All without hard-coding any network credentials!
WiFiManager On Demand
By default, WiFManager will only run when the ESP32 has no valid network
configuration information. But there may be times when you want to run it on
demand, such as when you move your ESP32 to a new location with a new WiFi
network, or if you have multiple networks and wish to join another one.
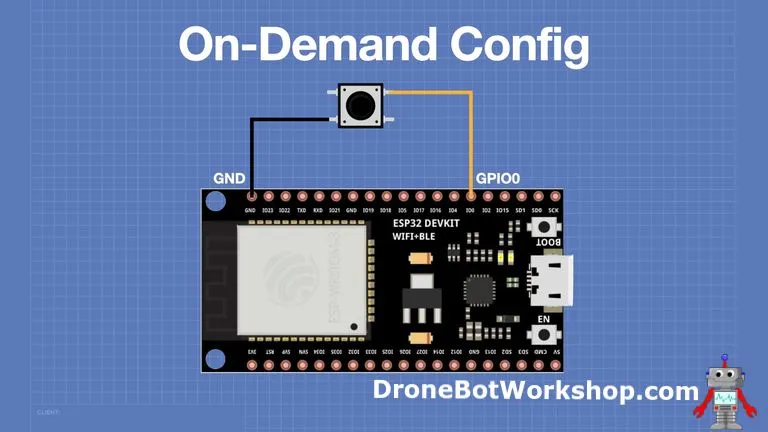
You can use WiFiManager in an “on-demand” configuration. You’ll need to add a
pushbutton to your ESP32, and you can then push it to invoke WiFiManager.
The following illustration shows a pushbutton wired between GPIO pin 0 and
ground. You can use a different GPIO pin if pin 0 is not available.
 The code for running WiFiManager on-demand is in another example included with
the library. Go into the example code and look for the OnDemand entry. Open the
only sketch in this entry, OnDemandConfigPortal.
The sketch is very similar to the first one, except for the fact that it runs in
the Loop. We constantly check to see if the button has been pressed, and if it
has, we run the WiFiManager as we did before.
The code for running WiFiManager on-demand is in another example included with
the library. Go into the example code and look for the OnDemand entry. Open the
only sketch in this entry, OnDemandConfigPortal.
The sketch is very similar to the first one, except for the fact that it runs in
the Loop. We constantly check to see if the button has been pressed, and if it
has, we run the WiFiManager as we did before.
OnDemandConfigPortal Example
/*F********************************************************************
* OnDemandConfigPortal.ino
* example of running the configPortal AP manually, independantly from the captiveportal
* trigger pin will start a configPortal AP for 120 seconds then turn it off.
**********************************************************************/
#include <WiFiManager.h> // https://github.com/tzapu/WiFiManager
//************************* DEFINES ************************************
#define TRIGGER_PIN 0 // PIN WILL TRIGGER CONFIGURATION PORTAL WHEN SET LOW
#define BAUD 9600
//************************* PROTOTYPES ************************************
//************************* VARIABLES ************************************
int timeout = 120; // SECONDS TO RUN
/*F********************************************************************
*
**********************************************************************/
void
setup()
{
WiFi.mode( WIFI_STA ); // EXPLICITLY SET MODE, ESP DEFAULTS TO STA+AP
// PUT YOUR SETUP CODE HERE, TO RUN ONCE:
Serial.begin( BAUD );
Serial.println( "\n Starting" );
pinMode( TRIGGER_PIN, INPUT_PULLUP );
}
/*F********************************************************************
*
**********************************************************************/
void
loop()
{
// IS CONFIGURATION PORTAL REQUESTED?
if( digitalRead( TRIGGER_PIN ) == LOW )
{
WiFiManager wm;
// RESET SETTINGS - FOR TESTING
//wm.resetSettings();
// SET CONFIGPORTAL TIMEOUT
wm.setConfigPortalTimeout( timeout );
if( !wm.startConfigPortal( "OnDemandAP" ) )
{
Serial.println( "failed to connect and hit timeout" );
delay( 3000 );
// RESET AND TRY AGAIN, OR MAYBE PUT IT TO DEEP SLEEP
ESP.restart();
delay( 5000 );
}
// IF YOU GET HERE YOU ARE CONNECTED TO WiFI
Serial.println( "connected...yeey : )" );
}
// PUT YOUR MAIN CODE HERE, TO RUN REPEATEDLY
}
If you use a different GPIO pin, just change the value of TRIGGER_PIN in the
declarations section.
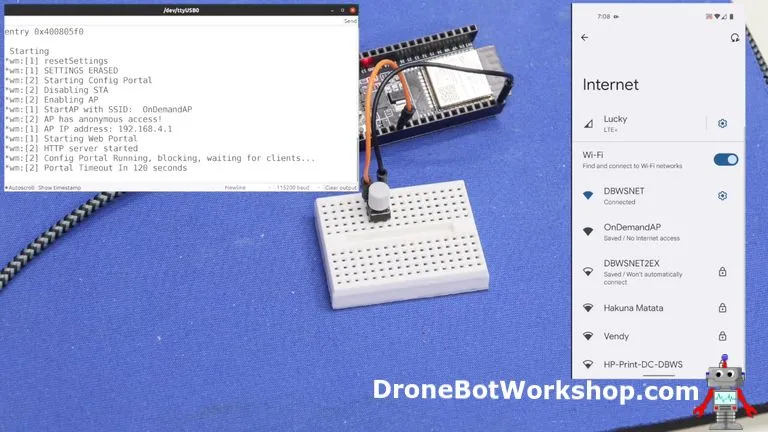 Load and run the sketch, with the serial monitor open. You should now be able to
start the local access point, OnDemandAP, anytime by pressing the button.
Load and run the sketch, with the serial monitor open. You should now be able to
start the local access point, OnDemandAP, anytime by pressing the button.
Modifying Existing Sketches to use WiFiManager
We have now seen a couple of ways to run the WiFiManager utility. But how do we
modify our own sketches to make use of it?
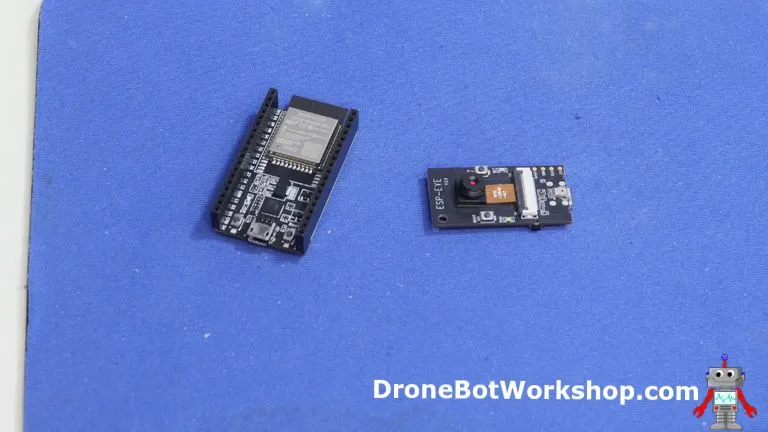
 I’ll show you exactly that, using a popular example sketch for the ESP32-CAM. In
my case, I’ll be using the ESP EYE, another ESP32 camera-equipped board. You can
use the same principles to modify any ESP32 sketch.
I’ll show you exactly that, using a popular example sketch for the ESP32-CAM. In
my case, I’ll be using the ESP EYE, another ESP32 camera-equipped board. You can
use the same principles to modify any ESP32 sketch.
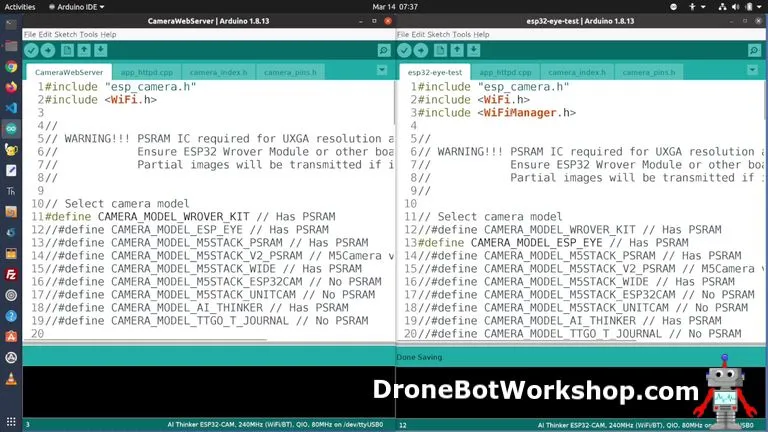
Modifying the Camera Web Server Sketch
The CameraWebServer sketch is buried within the examples for the ESP32, in the
Camera menu item. We have used this sketch before when we worked with the
ESP32-CAM board. It’s a complete camera control center and would be perfect for
a remote camera setup.
All it needs is WiFiManager to make it complete!
Modifying the sketch is very easy:
- 1 – Include the WiFiManager library in the sketch.
#include <WiFiManager.h>
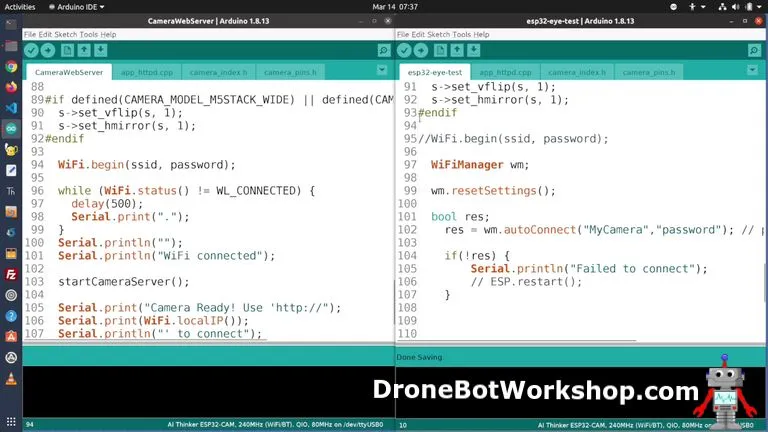
- 2 – Replace the WiFi connection code as follows:
ORIGINAL ( REMOVE )
WiFi.begin( ssid, password );
REPLACEMENT:
WiFiManager wm;
bool res;
res = wm.autoConnect( "AutoConnectAP", "password" ); // PASSWORD PROTECTED AP
if( !res )
{
Serial.println( "Failed to connect" );
// ESP.restart();
}
That’s all you need to do! Your sketch will now work with WiFiManager,
eliminating the need to hard-code the SSID and password.
Adding Custom Parameters
WiFiManager works great for obtaining your SSID and password information, but it
can also be used to collect other configuration data as well.
This is perfect if you need to capture additional information, such as API keys,
for your device to function.
Modifying the WiFiManager screen with additional text boxes is a 2-step process:
1 – You use the WiFiManagerParameter function to define your new text box.
2 – You add the parameter you’ve defined using the addParameter function.
The following code illustrates how this is accomplished:
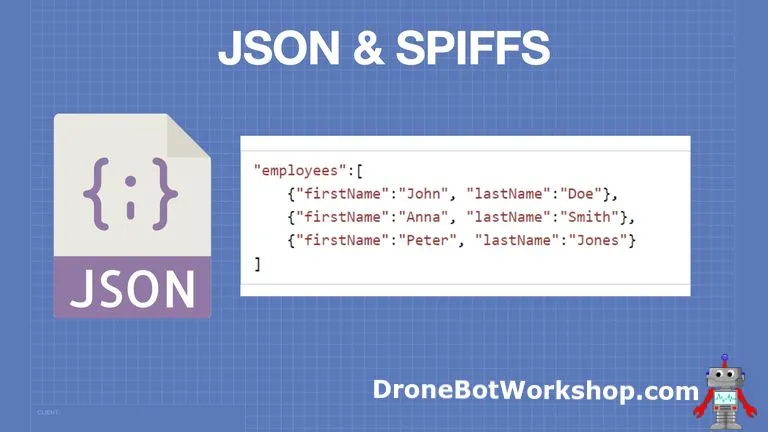 Now that we have our data arranged, we will need to have a method of storing it
in the flash memory. This is where SPIFFS comes in.
SPIFFS is an abbreviation for SPI Flash File System. It is a file system used
with NOR-gate embedded flash memory, which is the type of memory included on the
ESP32.
SPIFFS allows you to treat the memory almost as you would treat SD or MicroSD
card memory. I said “almost”, as there are a few differences. One difference is
that SPIFFS does not support directories, although you can mimic them to some
degree.
Flash memory has a limited number of write operations, so SPIFFS employs a
number of techniques to maximize the lifespan of the memory. When the memory is
formatted or erased, all the bits are set to one. When data is written to memory
, only the bits that need to be pulled to zero are affected. SPIFFS also uses
“wear leveling” to spread the data equally across the memory.
By using JSON and SPIFFS we can store a good amount of configuration information
in our ESP32, most ESP32 devices allocate about 1.5Mb for SPIFFS.
Now that we have our data arranged, we will need to have a method of storing it
in the flash memory. This is where SPIFFS comes in.
SPIFFS is an abbreviation for SPI Flash File System. It is a file system used
with NOR-gate embedded flash memory, which is the type of memory included on the
ESP32.
SPIFFS allows you to treat the memory almost as you would treat SD or MicroSD
card memory. I said “almost”, as there are a few differences. One difference is
that SPIFFS does not support directories, although you can mimic them to some
degree.
Flash memory has a limited number of write operations, so SPIFFS employs a
number of techniques to maximize the lifespan of the memory. When the memory is
formatted or erased, all the bits are set to one. When data is written to memory
, only the bits that need to be pulled to zero are affected. SPIFFS also uses
“wear leveling” to spread the data equally across the memory.
By using JSON and SPIFFS we can store a good amount of configuration information
in our ESP32, most ESP32 devices allocate about 1.5Mb for SPIFFS.