ESP32 NTP Client-Server: Get Date and Time ( Arduino IDE)
Learn how to request date and time from an NTP Server using the ESP32 with
Arduino IDE. Getting date and time is useful in data logging projects to
timestamp readings. To get time from an NTP Server, the ESP32 needs to have an
Internet connection and you don’t need additional hardware ( like an RTC clock).
 ESP32 NTP Client-Server Get Date and Time Arduino IDE
Before proceeding with this tutorial you need to have the ESP32 add-on installed
in your Arduino IDE:
Installing the ESP32 Board in Arduino IDE ( Windows, Mac OS X, Linux)
Recommended: Get Date and Time with ESP8266 NodeMCU NTP Client-Server
ESP32 NTP Client-Server Get Date and Time Arduino IDE
Before proceeding with this tutorial you need to have the ESP32 add-on installed
in your Arduino IDE:
Installing the ESP32 Board in Arduino IDE ( Windows, Mac OS X, Linux)
Recommended: Get Date and Time with ESP8266 NodeMCU NTP Client-Server
NTP ( Network Time Protocol)
NTP stands for Network Time Protocol and it is a networking protocol for clock
synchronization between computer systems. In other words, it is used to
synchronize computer clock times in a network.
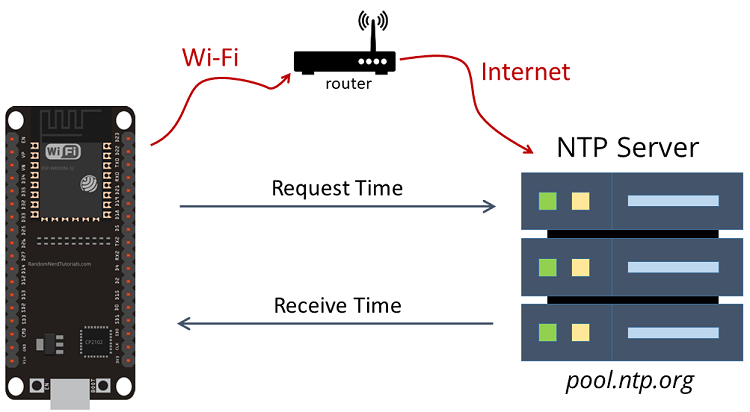
There are NTP servers like pool.ntp.org that anyone can use to request time as a
client. In this case, the ESP32 is an NTP Client that requests time from an NTP
Server ( pool.ntp.org).
 NTP Network Time Protocol ESP32 Request time and date
Getting Date and Time from NTP Server
To get date and time with the ESP32, you don’t need to install any libraries.
You simply need to include the time.h library in your code.
The following code gets date and time from the NTP Server and prints the results
on the Serial Monitor. It was based on the example provided by the time.h library.
/*F********************************************************************
* Rui Santos
Complete project details at https://RandomNerdTutorials.com/esp32-date-time-ntp-client-server-arduino/
Permission is hereby granted, free of charge, to any person obtaining a copy
of this software and associated documentation files.
The above copyright notice and this permission notice shall be included in all
copies or substantial portions of the Software.
**********************************************************************/
#include
#include "time.h"
//************************* DEFINES ************************************
const char* ssid = "REPLACE_WITH_YOUR_SSID";
const char* password = "REPLACE_WITH_YOUR_PASSWORD";
const char* ntpServer = "pool.ntp.org";
const long gmtOffset_sec = 0;
const int daylightOffset_sec = 3600;
//************************* PROTOTYPES ************************************
void printLocalTime();
//************************* VARIABLES ************************************
/*F********************************************************************
*
**********************************************************************/
void
setup( )
{
Serial.begin( 115200 );
// Connect to Wi-Fi
Serial.print( "Connecting to " );
Serial.println( ssid );
WiFi.begin( ssid, password );
while( WiFi.status() != WL_CONNECTED )
{
delay( 500 );
Serial.print( "." );
}
Serial.println( "" );
Serial.println( "WiFi connected." );
// INIT AND GET TIME
configTime( gmtOffset_sec, daylightOffset_sec, ntpServer );
printLocalTime();
WiFi.disconnect( true ); // DISCONNECT WiFi AS IT'S NO LONGER NEEDED
WiFi.mode( WIFI_OFF );
}
/*F********************************************************************
*
**********************************************************************/
void
loop()
{
delay( 1000 );
printLocalTime();
}
/*F********************************************************************
*
**********************************************************************/
void
printLocalTime()
{
struct tm timeinfo;
if( !getLocalTime( &timeinfo ) )
{
Serial.println( "Failed to obtain time" );
return;
}
Serial.println( &timeinfo, "%A, %B %d %Y %H:%M:%S" );
Serial.print( "Day of week: " );
Serial.println( &timeinfo, "%A" );
Serial.print( "Month: " );
Serial.println( &timeinfo, "%B" );
Serial.print( "Day of Month: " );
Serial.println( &timeinfo, "%d" );
Serial.print( "Year: " );
Serial.println( &timeinfo, "%Y" );
Serial.print( "Hour: " );
Serial.println( &timeinfo, "%H" );
Serial.print( "Hour ( 12 hour format ): " );
Serial.println( &timeinfo, "%I" );
Serial.print( "Minute: " );
Serial.println( &timeinfo, "%M" );
Serial.print( "Second: " );
Serial.println( &timeinfo, "%S" );
Serial.println( "Time variables" );
char timeHour[3];
strftime( timeHour,3, "%H", &timeinfo );
Serial.println( timeHour );
char timeWeekDay[10];
strftime( timeWeekDay,10, "%A", &timeinfo );
Serial.println( timeWeekDay );
Serial.println();
}
How the Code Works
Let’s take a quick look at the code to see how it works. First, include the
libraries to connect to Wi-Fi and get time.
#include
#include "time.h"
Setting SSID and Password
Type your network credentials in the following variables, so that the ESP32 is
able to establish an Internet connection and get date and time from the NTP
server.
// Replace with your network credentials
const char* ssid = "REPLACE_WITH_YOUR_SSID";
const char* password = "REPLACE_WITH_YOUR_PASSWORD";
NTP Server and Time Settings
Then, you need to define the following variables to configure and get time from
an NTP server: ntpServer, gmtOffset_sec and daylightOffset_sec.
NTP Server
We’ll request the time from pool.ntp.org, which is a cluster of timeservers that
anyone can use to request the time.
const char* ntpServer = "pool.ntp.org";
GMT Offset
The gmtOffset_sec variable defines the offset in seconds between your time zone
and GMT. We live in Portugal, so the time offset is 0. Change the time
gmtOffset_sec variable to match your time zone.
const long gmtOffset_sec = 0;
Daylight Offset
The daylightOffset_sec variable defines the offset in seconds for daylight
saving time. It is generally one hour, that corresponds to 3600 seconds
const int daylightOffset_sec = 3600;
setup()
In the setup( ) you initialize the Serial communication at baud rate defined
BAUDRATE to print the results:
Serial.begin( BAUD );
These next lines connect the ESP32 to your router.
// Connect to Wi-Fi
Serial.print( "Connecting to ");
Serial.println( ssid );
WiFi.begin( ssid, password );
while( WiFi.status() != WL_CONNECTED)
{
delay( 500 );
Serial.print( ".");
}
Serial.println( "");
Serial.println( "WiFi connected." );
Configure the time with the settings you’ve defined earlier:
configTime( gmtOffset_sec, daylightOffset_sec, ntpServer);
printLocalTime()
After configuring the time, call the printLocalTime( ) function to print the
time in the Serial Monitor.
In that function, create a time structure ( struct tm) called timeinfo that
contains all the details about the time ( min, sec, hour, etc…).
struct tm timeinfo;
The tm structure contains a calendar date and time broken down into its
components:
tm_sec: seconds after the minute;
tm_min: minutes after the hour;
tm_hour: hours since midnight;
tm_mday: day of the month;
tm_year: years since 1900;
tm_wday: days since Sunday;
tm_yday: days since January 1;
tm_isdst: Daylight Saving Time flag;
tm structure documentation.
struct tm
Time structure
Structure containing a calendar date and time broken down into its components.
The structure contains nine members of type int (in any order), which are:
C90 (C++98)C99 (C++11)